Sidebar
Table of Contents
Properties Tab
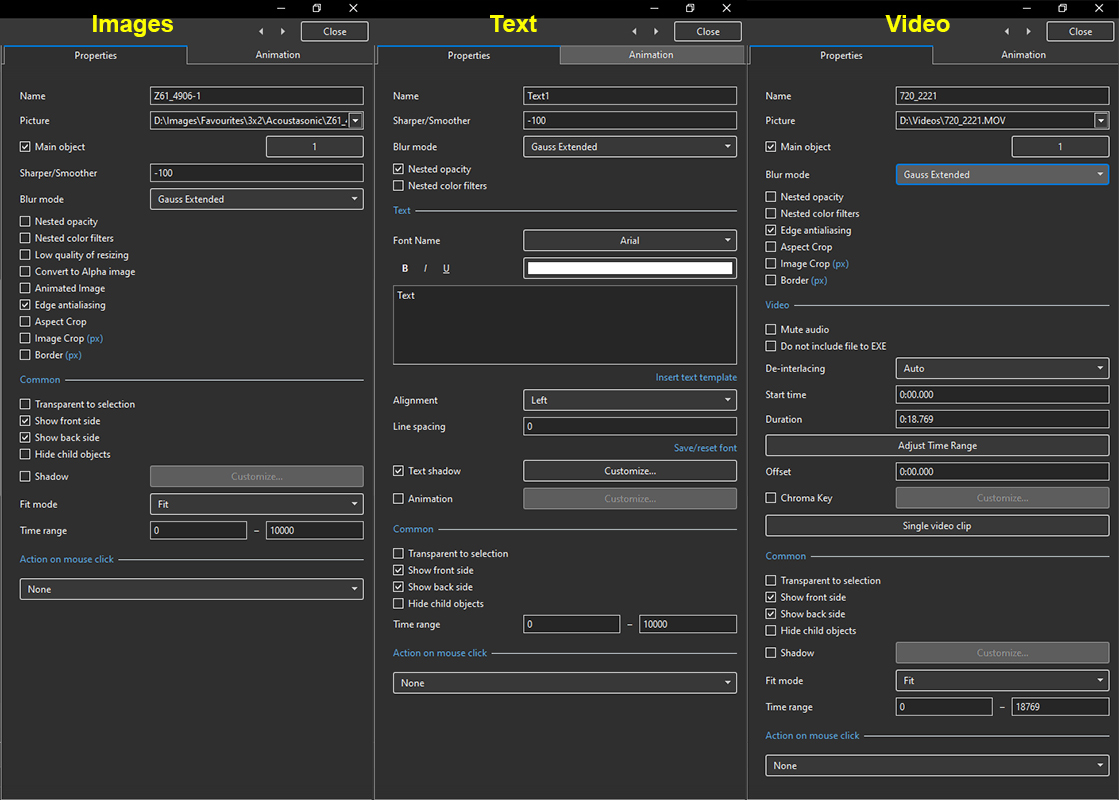
- The “Properties” tab is shown below.
- This is used to control and adjust the properties of objects inserted into the Editor window.
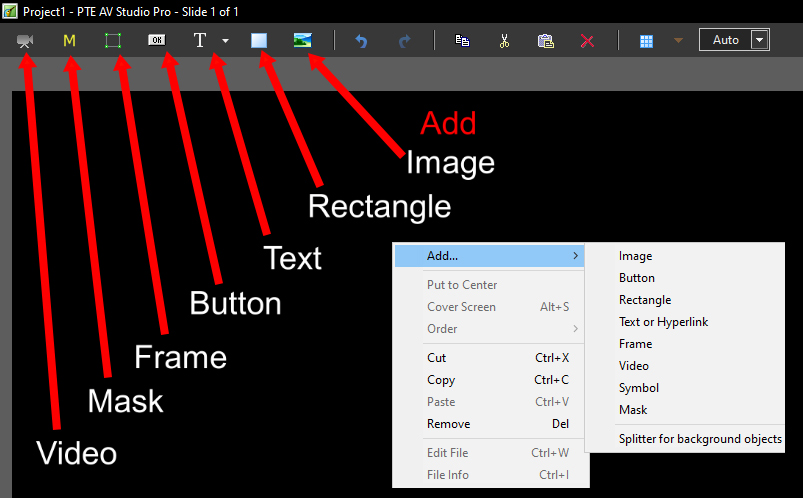
- Objects can be inserted using the menu toolbar at the top left of the window or via the right click drop down menu - ADD.
- The actual parameters shown in this tab vary depending on the type of object selected, e.g. images, buttons, rectangles, text.
- Name: This contains the name of the selected object which can be changed to more readily identify an object
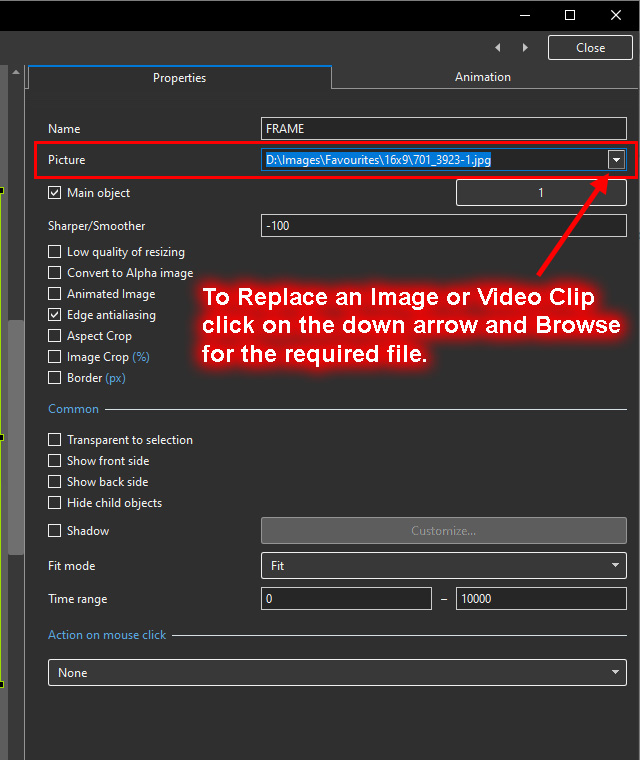
- Picture: This is the file name and location of the selected object. An alternative object (with the same properties, key frames etc) can be selected by changing the object address
- Main Object - an Index Number can be assigned for use in Styles
- Sharper(-)/Smoother(+):The default value is -100; Zero gives no Sharpening/Smoothing
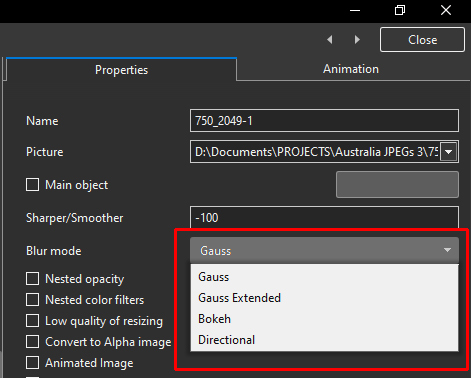
- Blur Mode - Choose from dropdown Menu - adjust in Animations Tab
- Gauss is the original blur mode
- Gauss Extended deals with the darkening at the edges which Gauss Mode creates (best for full screen images)
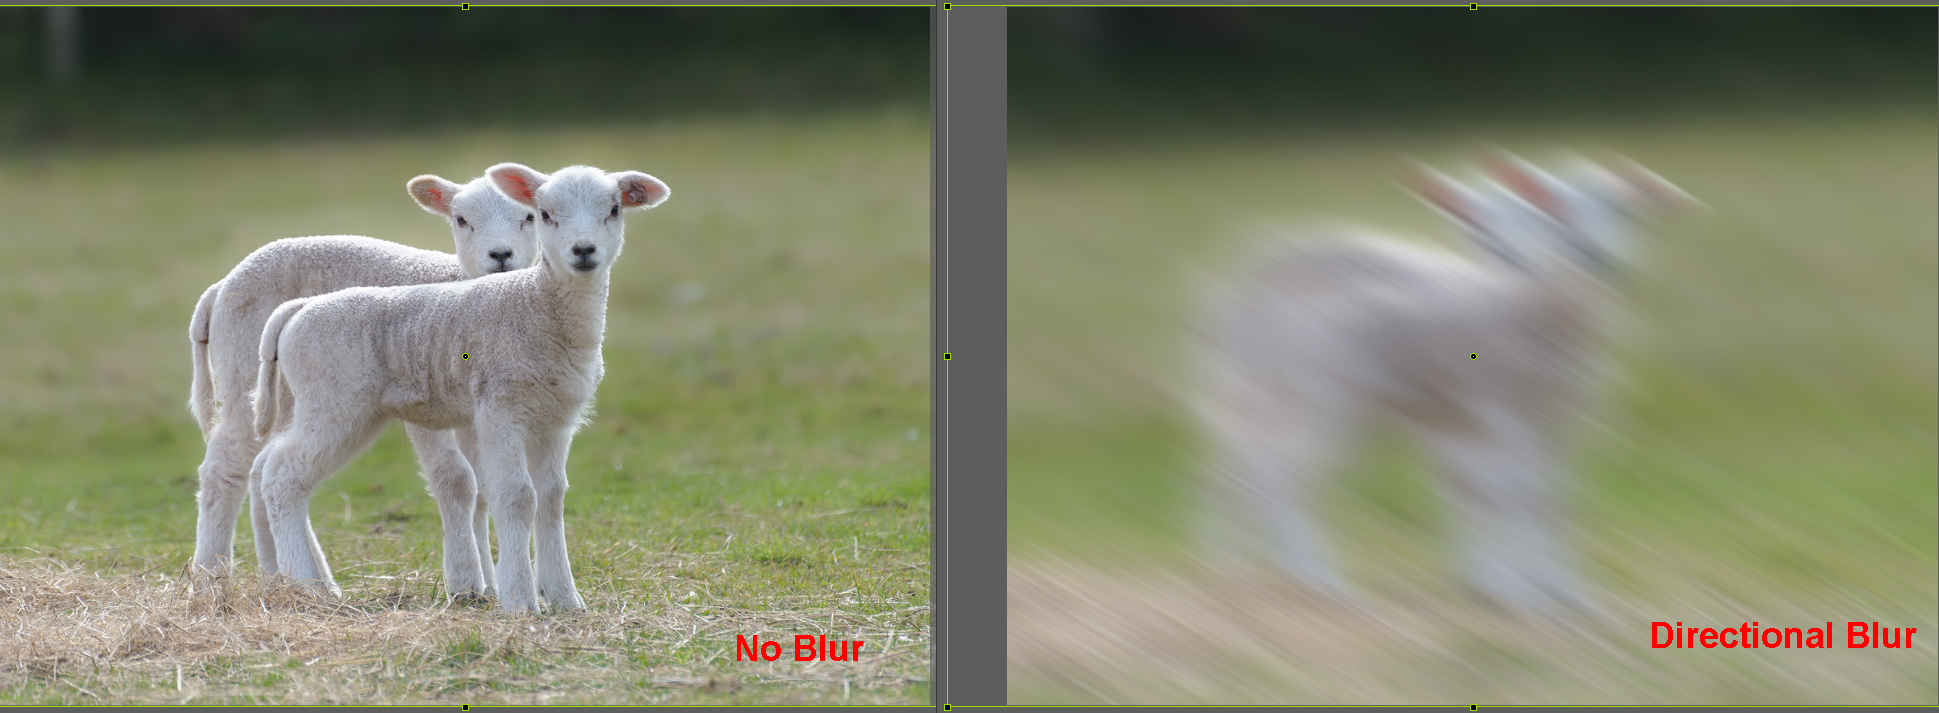
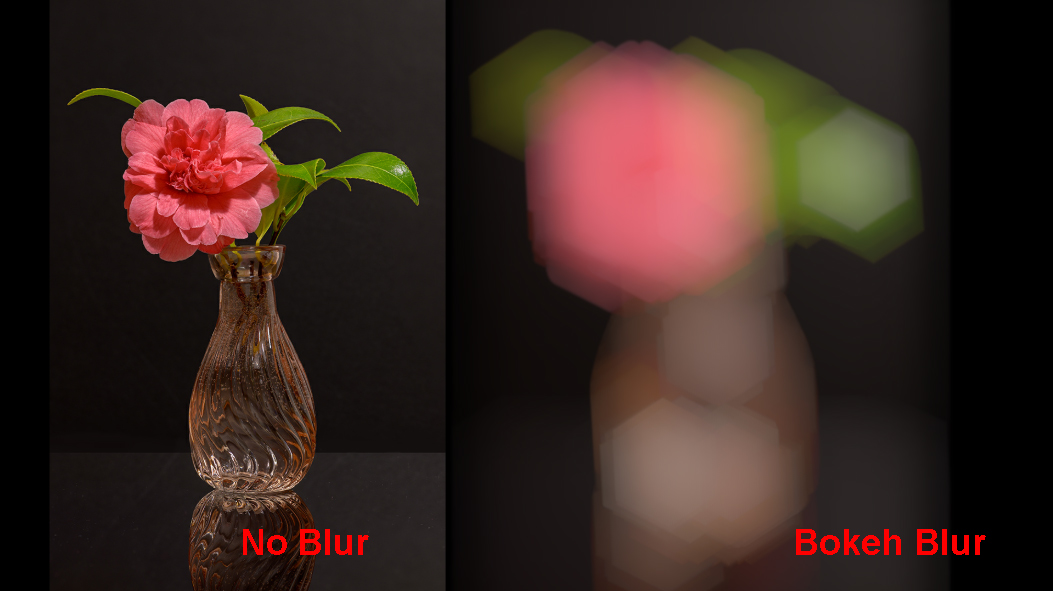
- Directional and Bokeh - see examples below
- Nested Opacity - When ticked you can control the opacity of child objects when adjusting the opacity of the Parent Object
- Nested Colour Filters - When ticked the effect of a Colour Filter on a Parent Object is also seen in any child object
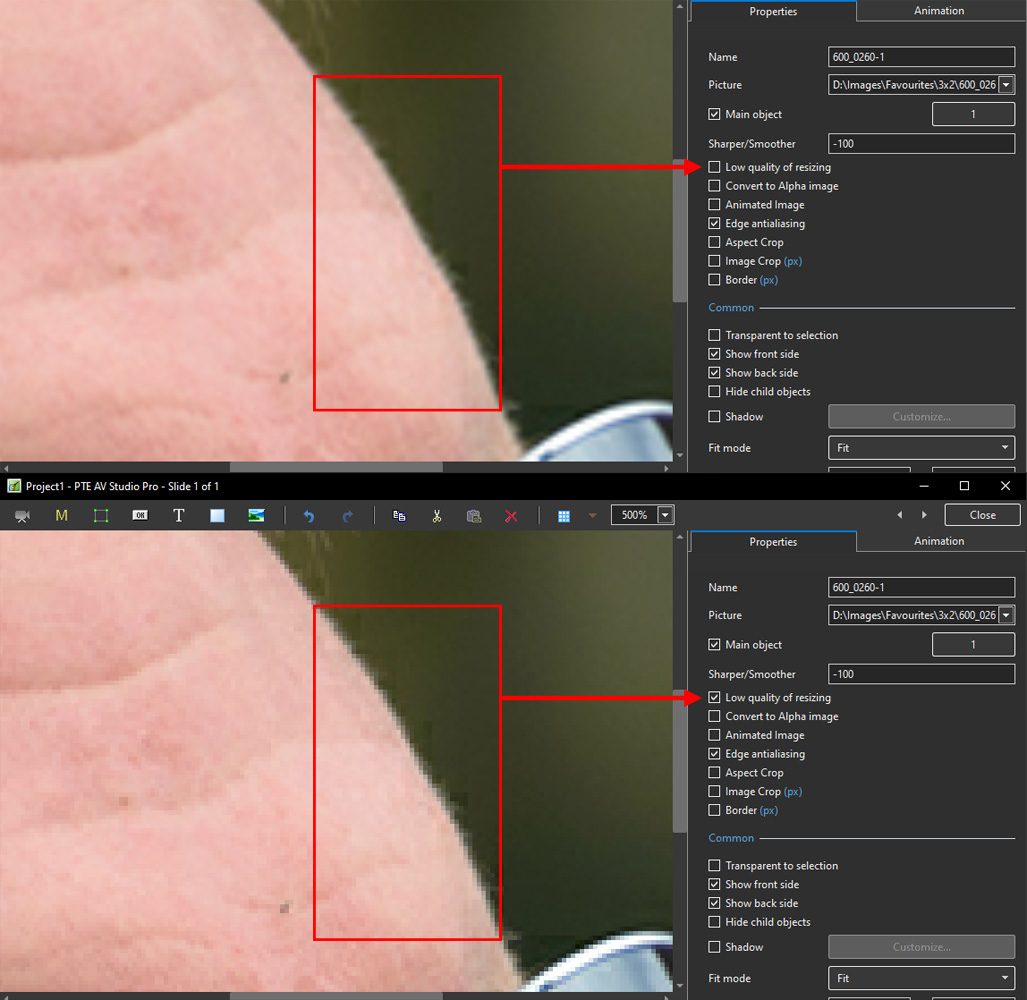
- Low quality of resizing: Affects the quality of the object - see example below
- Convert to Alpha image: See the section on Masks (Add a Mask Object); See also “Negative” with regard to “Inverting a Mask”
- Animated object: Select for animated png files
- Edge anti-aliasing: Used to give a smoother object appearance
- Aspect Ratio Crop: Provides a choice of aspect ratio -16:9/16:10/3:2/4:3/5:4/1:1
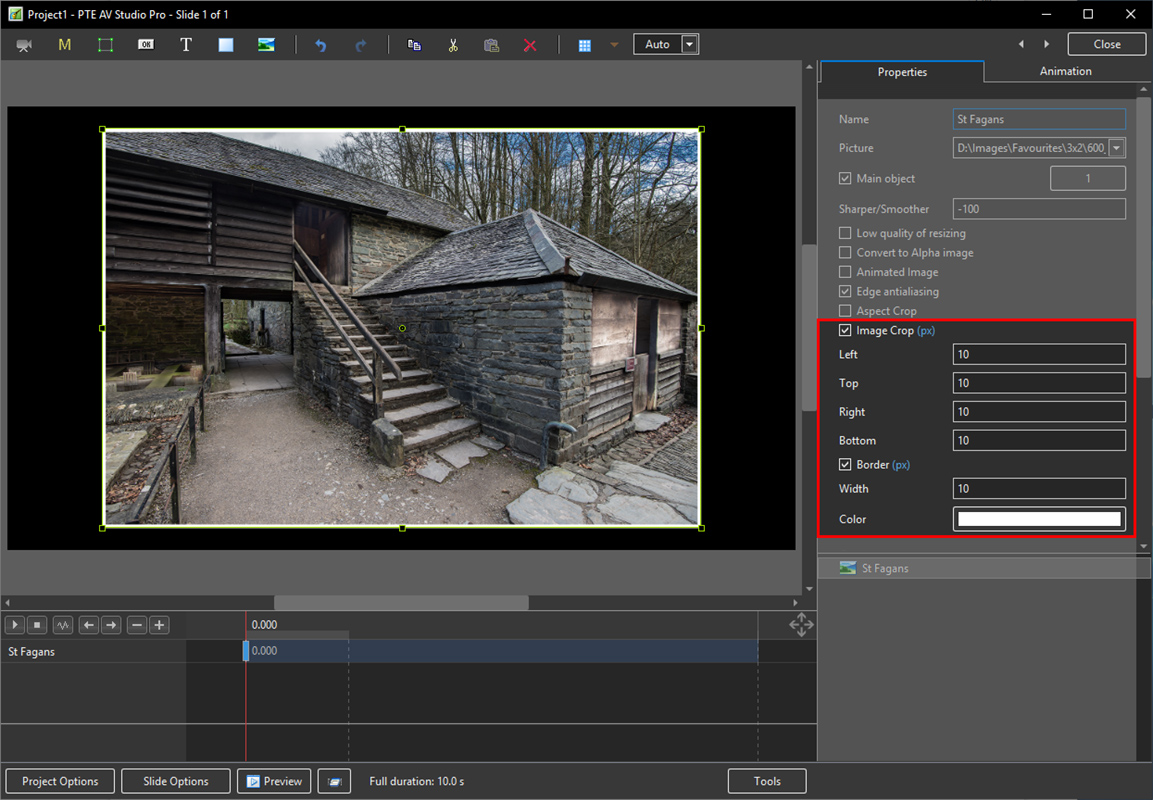
- Image Crop: Enables the top, bottom, right, or left sides of the object to be cropped (Pixels or Percentage)
- Border: Enables a border to be placed on an object and the colour to be chosen
Replace an Image or Video Clip
- In Objects and Animation/Properties/Picture
- An alternative object (with the same properties, key frames etc) can be selected by changing the object address
- To Replace an Image or Video Clip click on the down arrow and Browse for the required file
Low Quality of Resizing Examples
- Using this Control with Images which have been zoomed:
- At 100% (original Pixels) the effect is that of slight sharpening the image
- At higher percentages the effect is that shown above
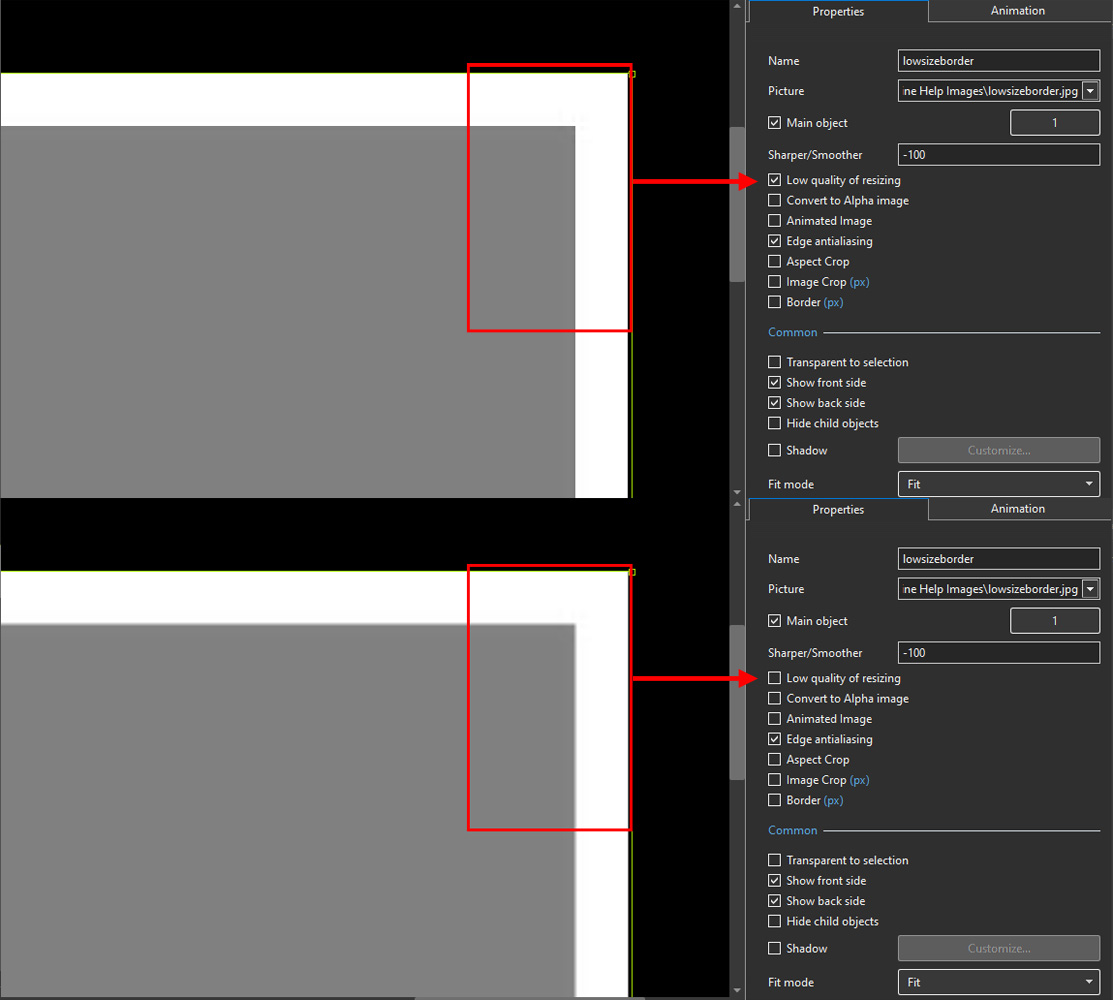
- And with Borders made in an External Editor etc
Image Crop and Border
- To add a border to an Image/Object and maintain the original Aspect Ratio:
- Use Image crop to subtract x Pixels from all sides of the Object/Image
- Use Border to add the same x Pixels to the Object/Image
- Choose a colour for the Border
- The Object/Image complete with Border is then the same Aspect Ratio as the original Object/Image
Common
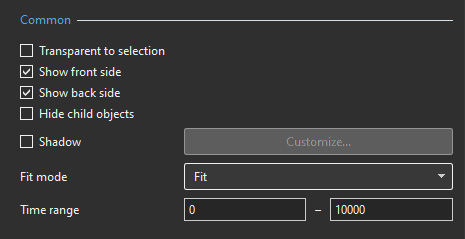
- Transparent to selection: Prevents inadvertent selection of an object with the Mouse
- Show front side: In 3D animation determines if the front of the object is seen
- Show back side: In 3D animation determines if the back of the object is seen
- Hide Child objects: Will hide any objects inserted as a Child of a main object when “Show Front / Back Sides” are BOTH UNTICKED
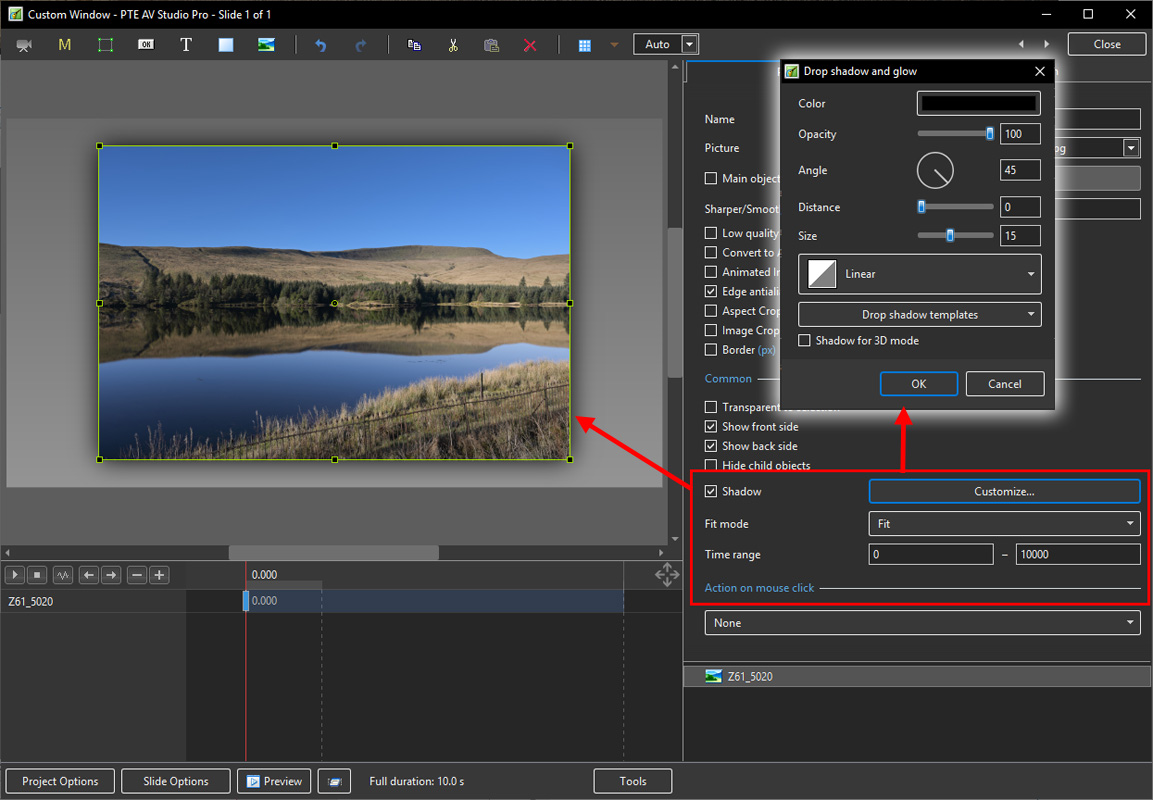
- Shadow: Enables a shadow to be applied to an object
- Fit Mode: Choose from “Fit” or “Cover”
- Time Range: Determines the start (0) and end of an Image/Object's visibility within the slide Example: 6555=6.555 seconds
Action on Mouse Click
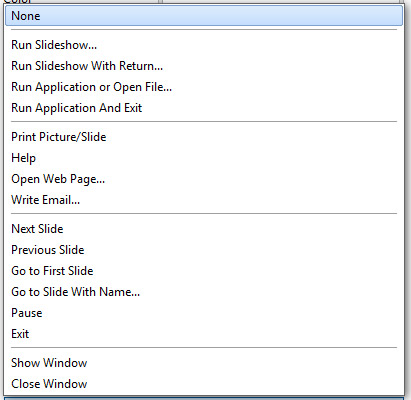
Run Slideshow
- Will run a slideshow made with the same version of Picturestoexe and exit. If you attempt to link to an EXE made in a previous/newer Version of Picturestoexe then a warning message is shown with instructions on how to proceed
Run Slideshow with return
- Will run a slideshow made with the same version of Picturestoexe and return to the slide containing the Hyperlink. If you attempt to link to an EXE made in a previous/newer Version of Picturestoexe then a warning message is shown with instructions on how to proceed
Run Application or open file
- Will open a Slideshow or another Application such as Adobe Photoshop, Microsoft Word etc. Alternatively point the link to a JPEG or Word Document and, if the default opening program for those files is Photoshop or Word, the file will open in the corresponding application. In the OPEN window select “all files” from the dropdown menu to select JPEGs or Word documents etc. When the selected File/Application is closed you are returned to the slide containing the Hyperlink
- To open a FOLDER in Windows Explorer (or MAC Equivalent) type in the PATH of the folder in quotes (“…..”) e.g. “D:\Images\Favourites”. In Windows it is possible to Right Click (or Shift and Right Click) on a Folder and choose to COPY PATH. The Path can then be pasted into the Action on Mouse Click Box
Run application and exit
- Will open a Slideshow or another Application such as Adobe Photoshop, Microsoft Word etc. Alternatively point the link to a JPEG or Word Document and, if the default opening program for those files is Photoshop or Word, the file will open in the corresponding application. In the OPEN window select “all files” from the dropdown menu to select JPEGs or Word documents etc. When the selected File/Application is closed you are returned to the desktop
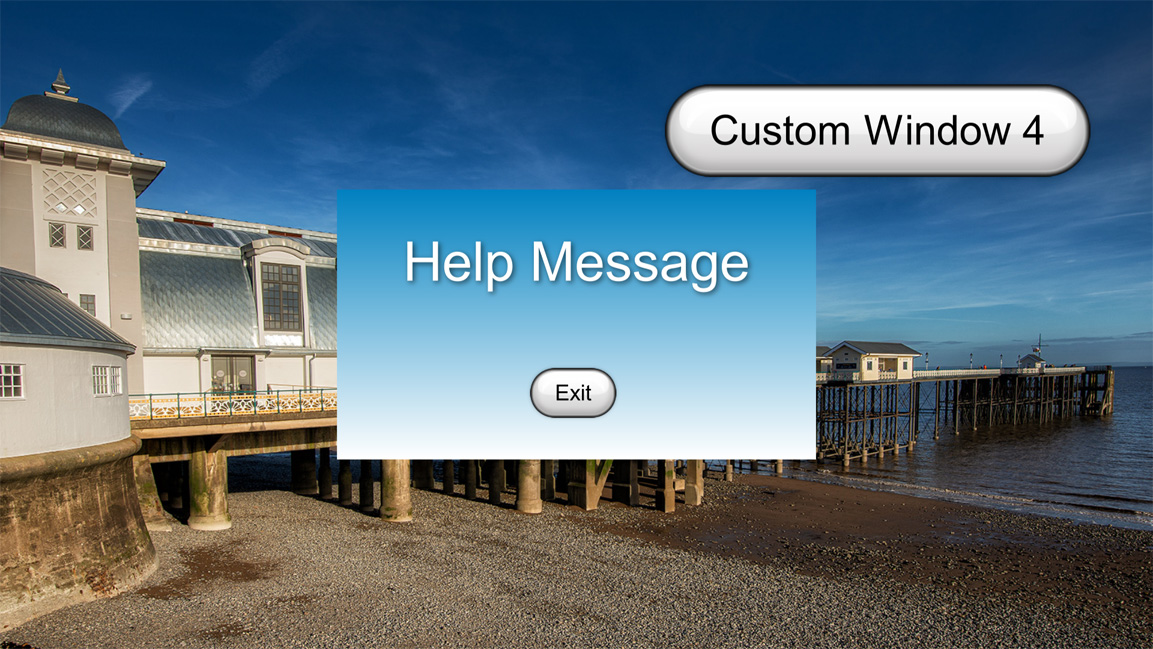
Display a Custom Window
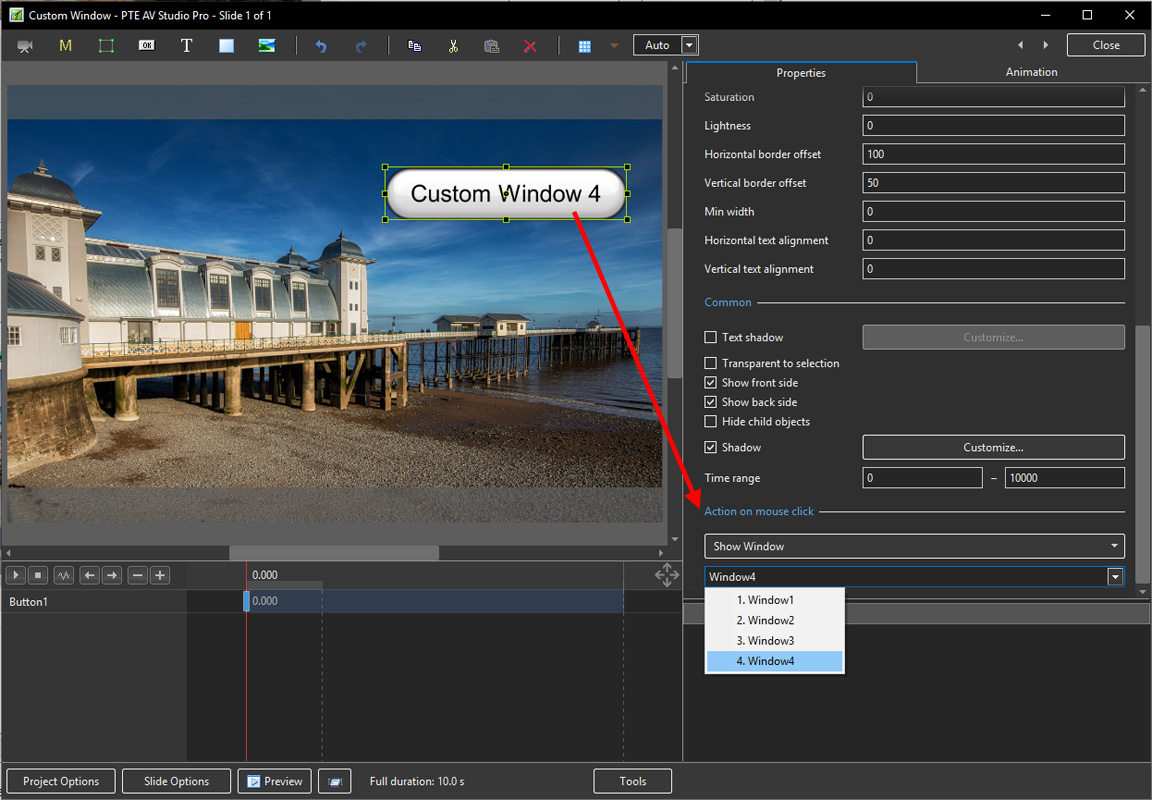
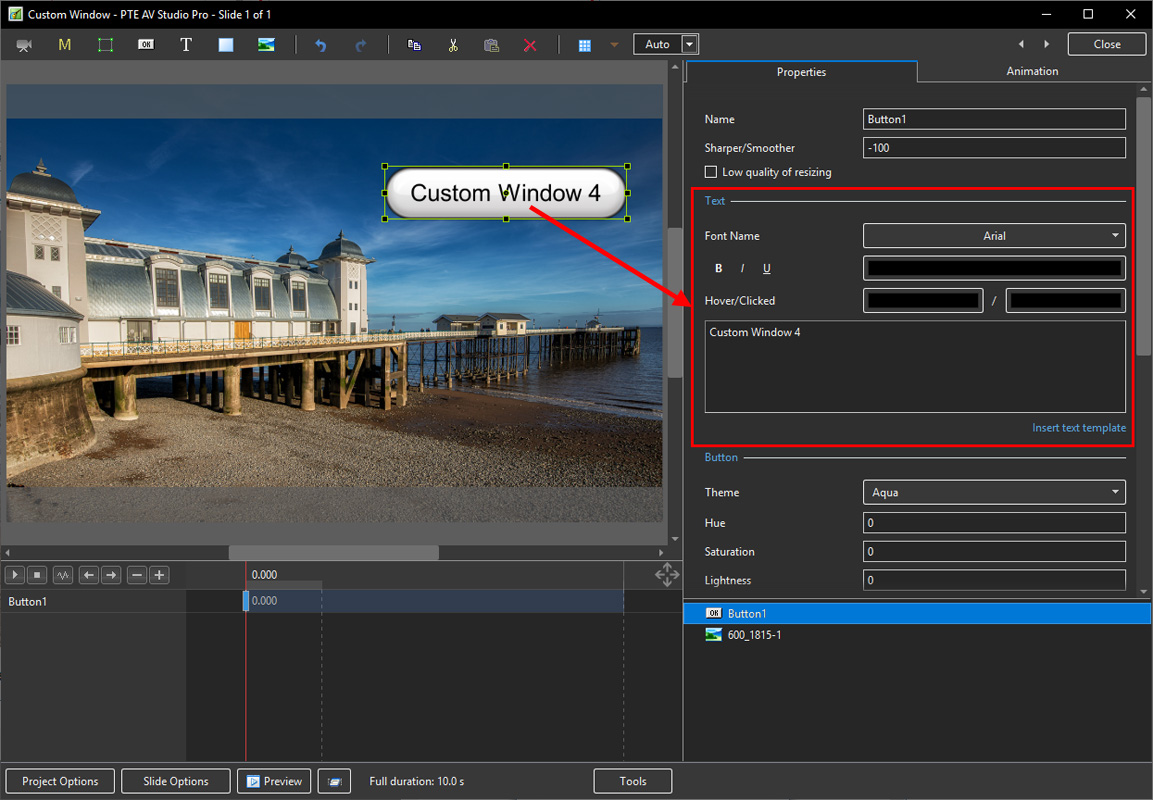
- In Objects and Animation add a Button (The Button can be made Transparent by changing its Opacity in the Animation Tab if required)
- In “Action on Mouse Click” click on the Button and choose “Show Window”
- From the Drop down Menu choose the Window to which you want to link
- See Project Options/Advanced for “Custom Window”
- In Text (for the Button) add the required Text
- In Preview or when the EXE is running clicking on the Button activates the Custom Window
Shadow - Customise Shadow
- Colour and Opacity determine the colour and strength of the shadow
- Angle determines the direction of the shadow
- Distance determines how far away from the object the shadow lies.
- A distance setting of zero produces a Global shadow directly behind the object and therefore on all four sides
- Size determines the “spread” of the shadow
- In the drop-down menu labelled “Linear” are a number of shadow profiles which the user can try for a variety of shadow effects
- Drop Shadow Templates allows the user to Save frequently used shadow profiles
Shadow Profiles / Styles
- The available Profiles giving two examples of each:
- Linear:
- Cone:
- Cone - Inverted:
- Cove - Deep
- Cove - Shallow
- Gaussian:
- Half Round
- Ring
- Ring - Double
- Tooth:
Please go to Project Options for details on Customising the Window Project Options Advanced Tab/Advanced Options
en-us/11.0/objectsandanimation_1/properties_tab.txt · Last modified: 2023/02/09 13:16 by davegee
Except where otherwise noted, content on this wiki is licensed under the following license: CC Attribution-Noncommercial-Share Alike 4.0 International
