Sidebar
This is an old revision of the document!
Table of Contents
Animation Tab
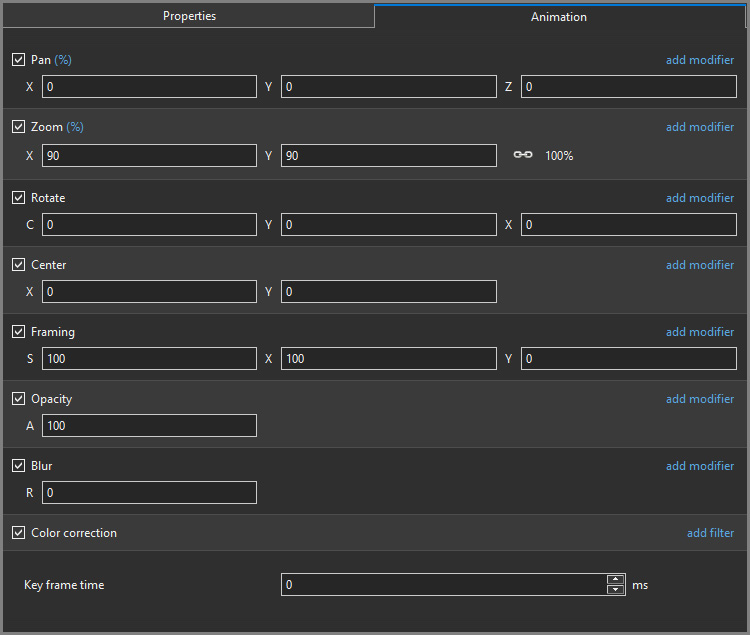
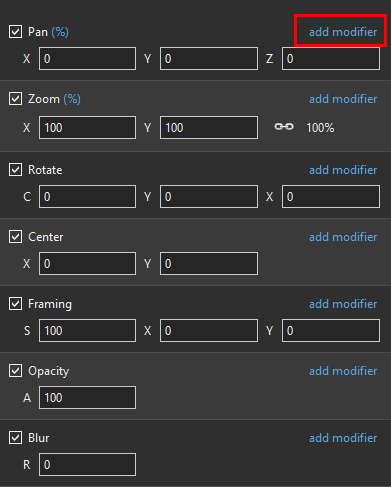
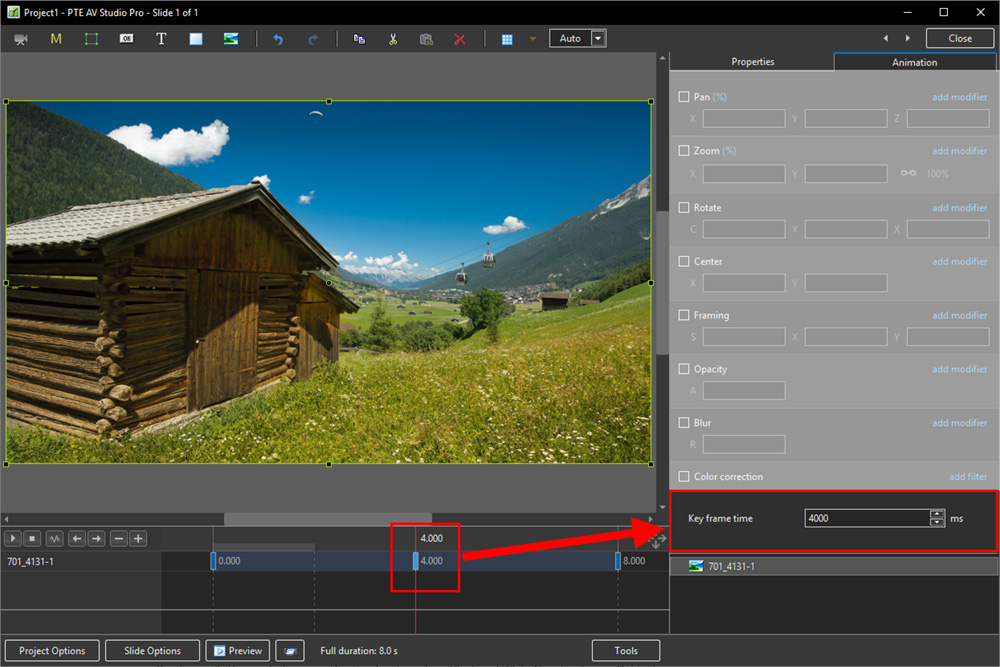
The Animation Tab is shown below.This provides the various adjustments and parameters to control animation of objects.
- For Pan and Rotate, adjustments can be made in three planes
- X,Y and Z for Pan
- C,Y and X for Rotate
- These adjustments replace the 3D parameters provided in Version 8.
- A new adjustment called Framing is provided (see Framing)
- The Color Correction parameters have been expanded in Version 9 (Color Correction)
- The “Key Frame Time” box shows the time (in milliseconds) of the selected Key Frame
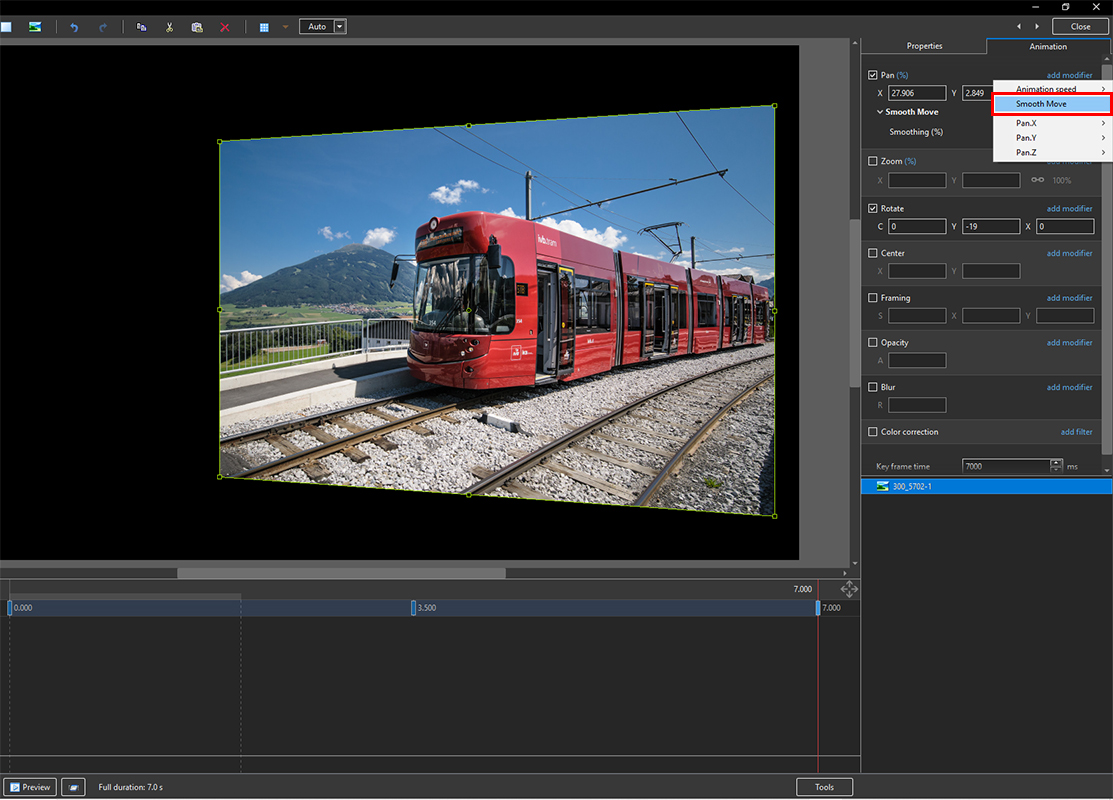
New In Version 11 - Smooth Move
- The Smooth Move Modifier can be used to create a Smooth path (Pan X;Y;Z) of an Object through three (or more) Key Frames with no pause or jump
- Apply the Modifier to Key Frames 1 and 2 etc
- Adjust the amount of Smoothing via the Smoothing % control
Parameter Controls
Display Mode for Pan and Zoom
Click on the “%” sign or the “100%” sign:
- “%” = Percentage Mode
- “px” = Pixels Mode
- “pt” = Original Points Mode
- “100%” = Full Height of Project Screen
- “Original Pixels” = The Original Pixel Size of the Image
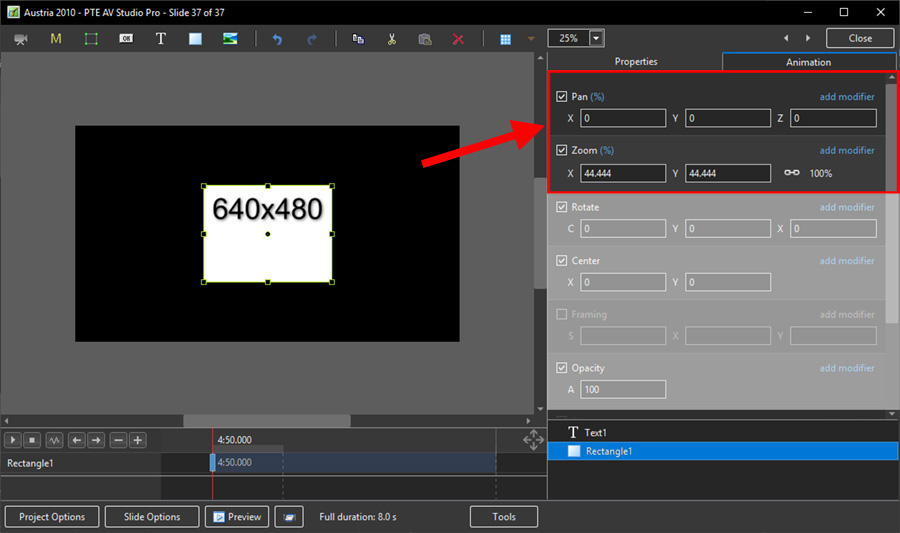
The Illustration below shows a 640×480 rectangle at Original Size in a 1920×1080 Project
- In Percentage Mode:
- The values for “X” and “Y” Pan are calculated for the Centre of the Object/Rectangle with respect to the Centre of the Slide
- The value of the Zoom Parameter is the percentage of the Full Height of the Project Screen (in this case 1080 pixels)
- 480/1080= 0.44444444444 = 44.44444444%
- In Pixels Mode:
- The values for “X” and “Y” Pan are calculated for the Top Left Corner of the Object/Rectangle with respect to the Top Left Corner of the Slide
- The value of the Zoom Parameter is the Pixel Size of the Object/Rectangle
- In Points Mode
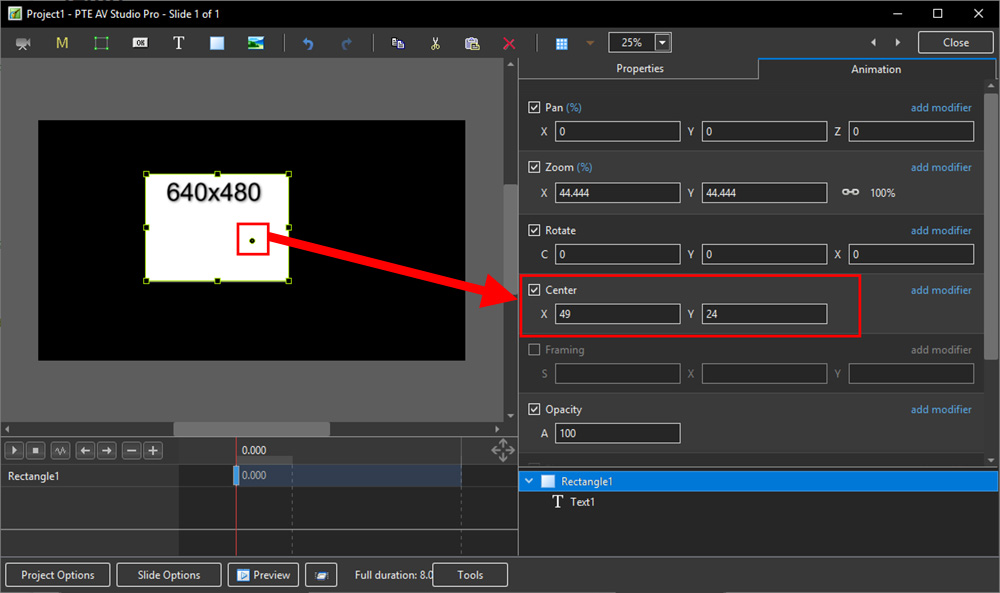
The Centre Control
- The “CENTRE” Control can be used to move the CENTRE or “Point of Rotation” of an Object as shown below:
The Rotate Control
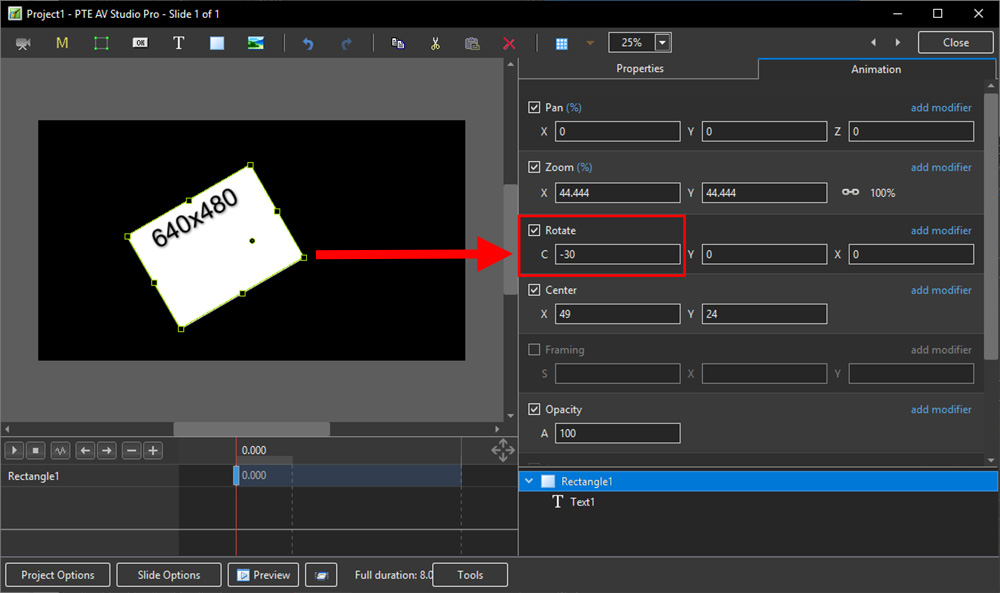
- The “Rotate C” Control will rotate an Object about its Centre Point in the same plane as the screen:
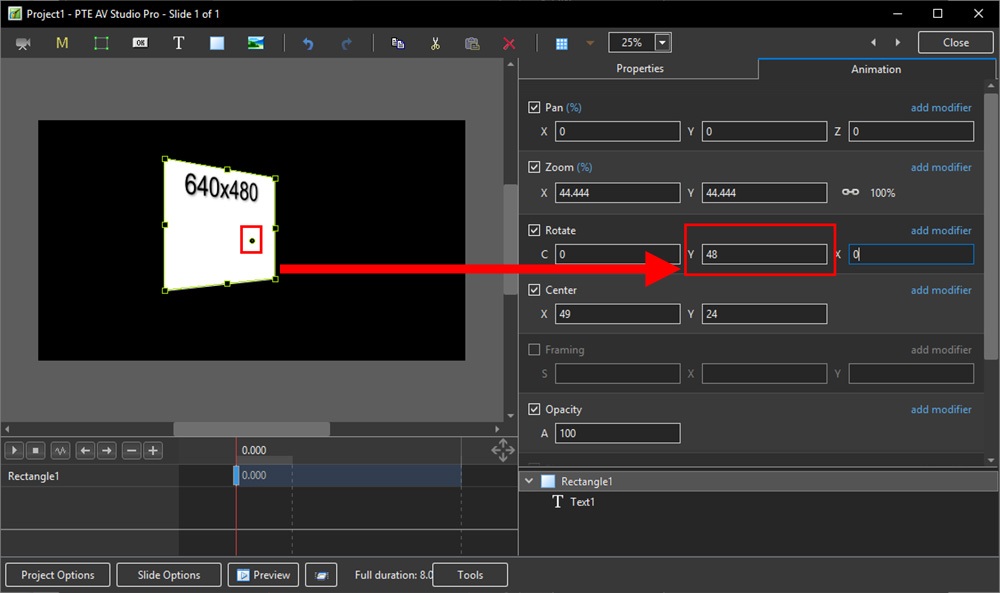
- The “Rotate Y” Control will rotate an Object about its Centre Point in 3 Dimensions Horizontally:
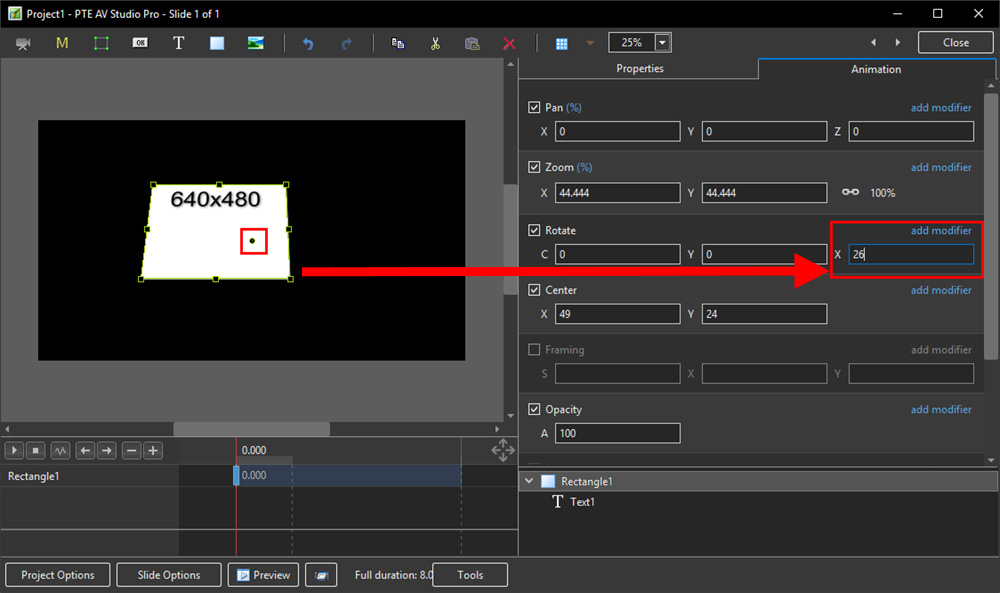
- The “Rotate X” Control will rotate an Object about its Centre Point in 3 Dimensions Vertically:
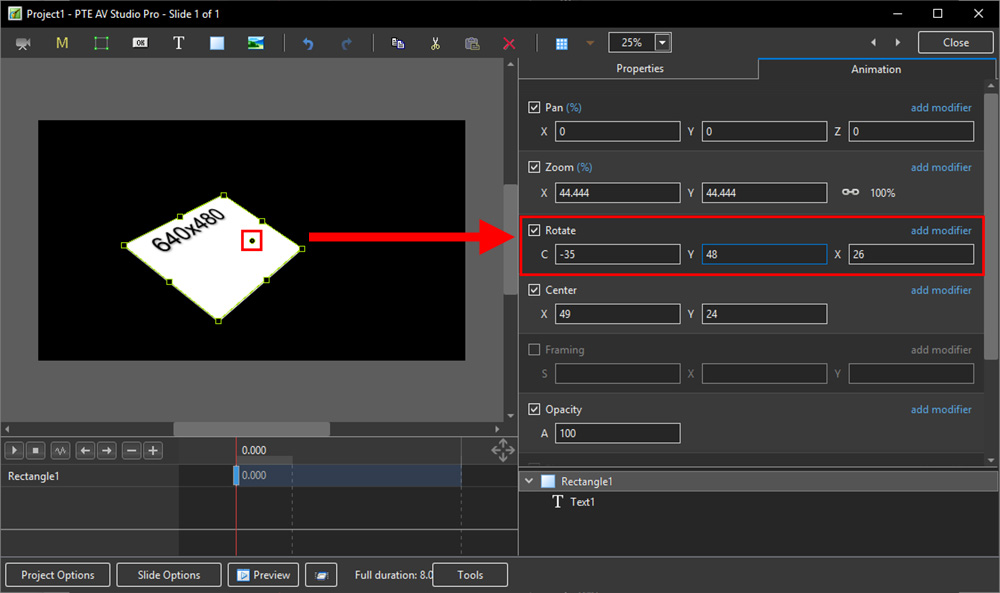
- The “C”, “Y” and “X” Rotate Controls can be used simultaneously:
Changing Parameters with the Mouse
- Place the Mouse on any Letter (e.g. X,Y or Z in the Pan Controls) and click and drag left or Right
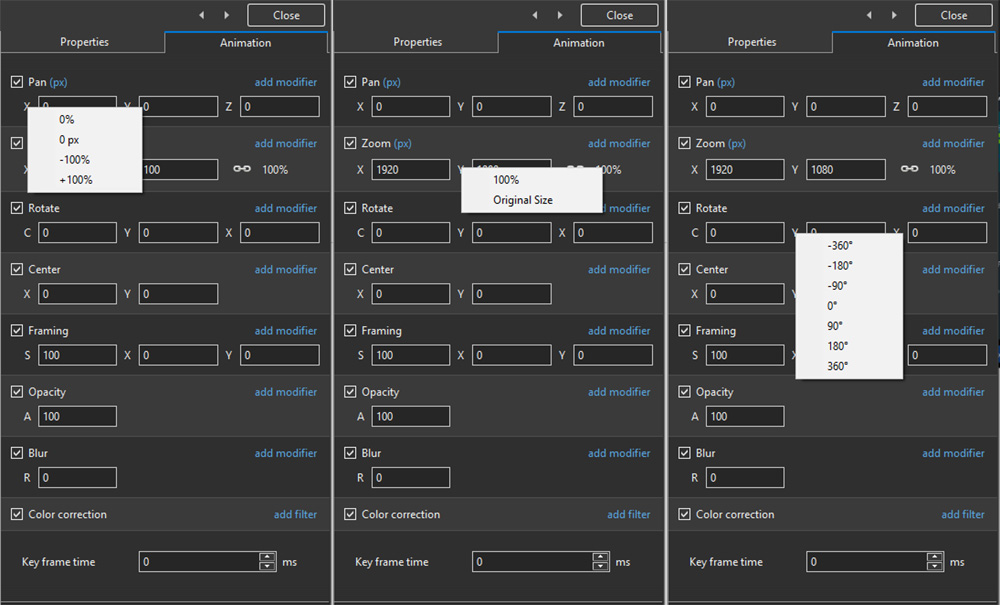
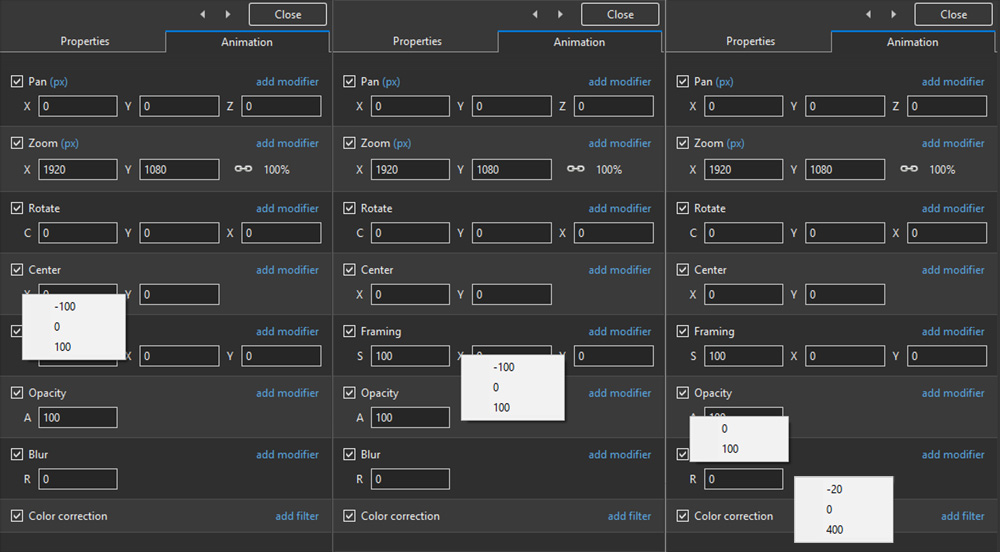
- You can also Right Click on any Letter and access commonly used Preset Values (See Right Click Menus below)
- You can “double click” on any letter to change the value back to its default state
Keyboard Entry
- In any box, highlight the existing value and type in a new value
OR Place the cursor in a box and:
- UP arrow on Keyboard increases the value by one unit
- DOWN arrow decreases the value by one unit
- Pg Up on Keyboard increases the value by ten units
- Pg Dn on Keyboard decreases the value by ten units
The UNITS depend on the chosen Display Mode:
- In % Mode the units will increase/decrease by 1% or 10% of the Parent Frame (or Background)
- In Px Mode the units will increase/decrease by 1 Pixel or 10 Pixels - relative to Project Size
- In Pt Mode the units will increase/decrease by 1 Pixel or 10 Pixels relative to the Original size of the Object
Pan
- The parameters can be read in Percentage, Pixels or Original Points
- X - Horizontal movement of the Object relative to the width of the Object's Parent Frame
- Y - Vertical movement of the Object relative to the height of the Object's Parent Frame
- Z - Zoom - “Closer to” or “further away from” the viewer
Zoom
- The parameters can be read in Percentage, Pixels or Original Points
- X - The horizontal dimension relative to the native size/resolution of the Object's Parent Frame
- Y - The vertical dimension relative to the native size/resolution of the Object's Parent Frame
- With the “Chain Link” deselected the object can be distorted
- With the “Chain Link” restored the distorted image/object can be scaled
- Shift + Click and Drag on the “bounding box” will temporarily “unlink” the X and Y parameters and allow the object to be “distorted”
- Click on 100% to return to default settings (100%)
The UNITS depend on the chosen Display Mode:
- In % Mode 100% = 100% of the Parent (Slide / Frame etc)
- In Px Mode the Pixel Dimensions of the Object are shown
- In Pt Mode 100% = 100% of the Native Pixels of the Object
The Right Click Menus for X, Y and Z
Framing
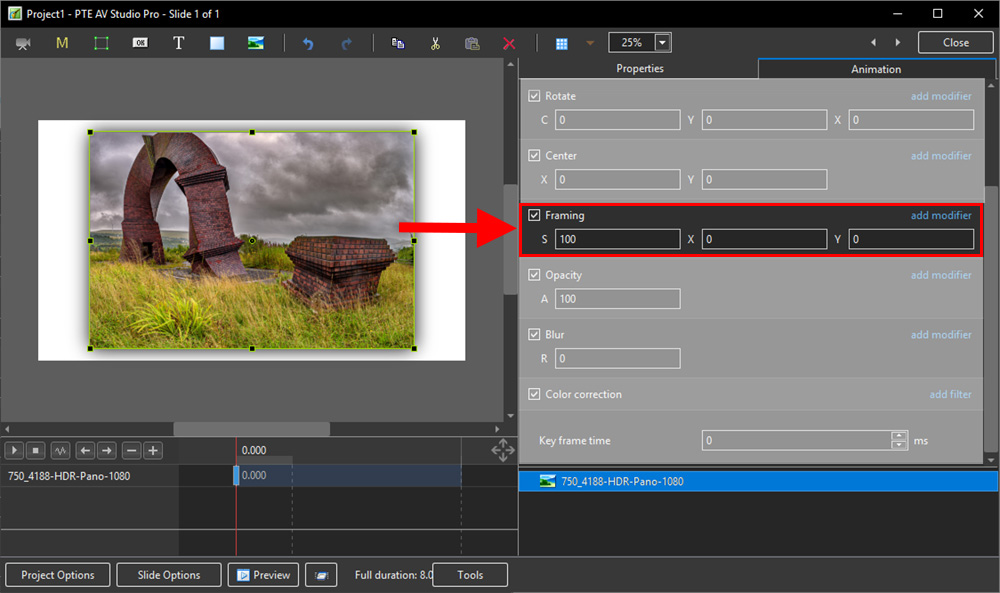
- Framing can be used to Pan and/or Zoom an Image within a Frame without modifying the frame itself
- Framing can also be used to adjust an Aspect Ratio mismatch
- In the example below a 4:3 image is shown within a 3:2 frame at 90% of full screen in a 16:9 Project.
- In the default 100% Scaling (S) the 4:3 Image has been “cut off” at the top and bottom of the Image and “Fits” the Width of the 3:2 Frame.
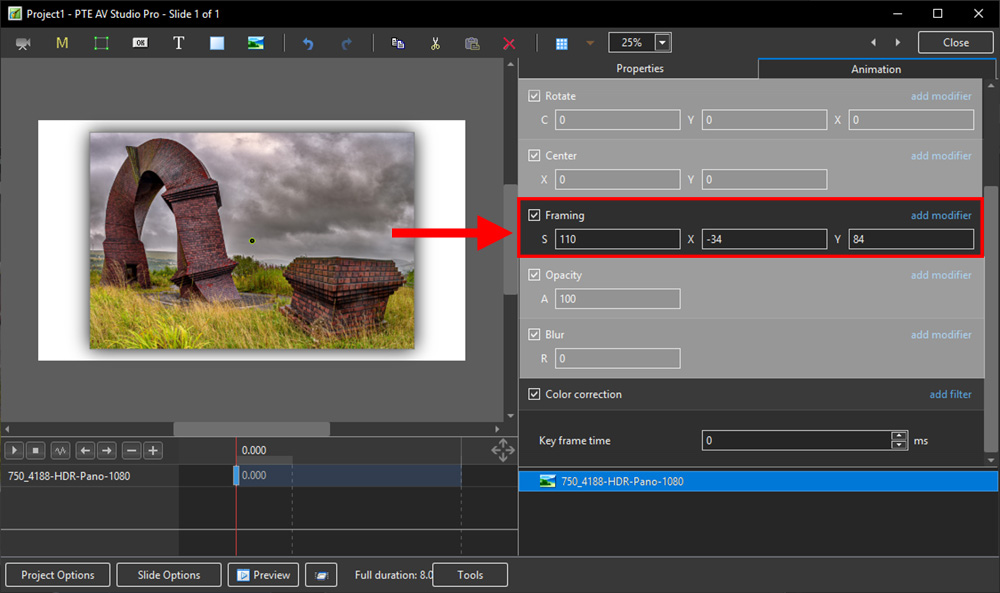
- By adjusting the “S”, “X” and “Y” Controls a “Best Fit” composition can be achieved
- Further Panning and Zooming is possible
Opacity and Blur
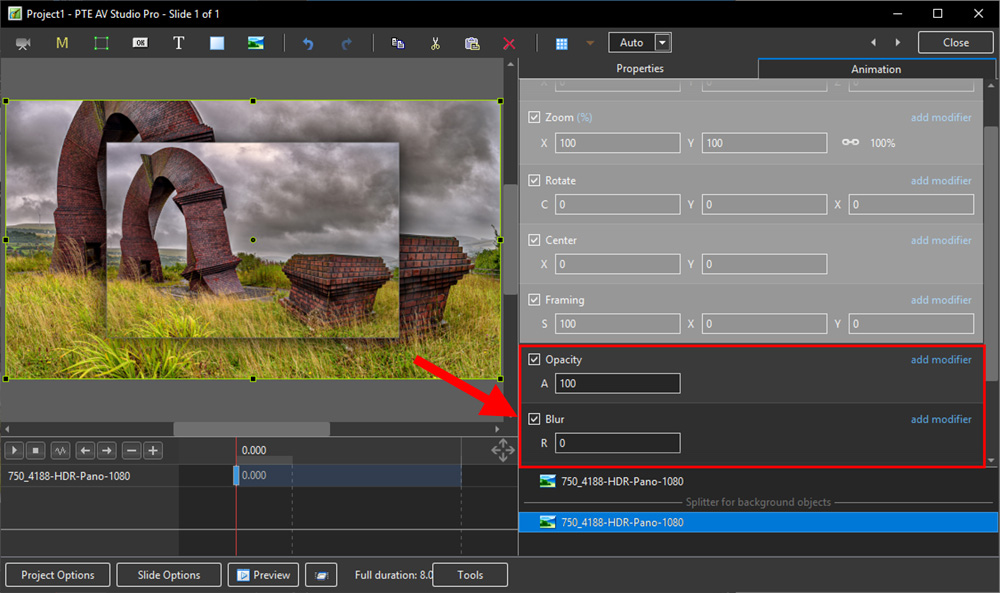
- The Illustration shows Main Image used as a Background Image at 100% Opacity and Zero Blur
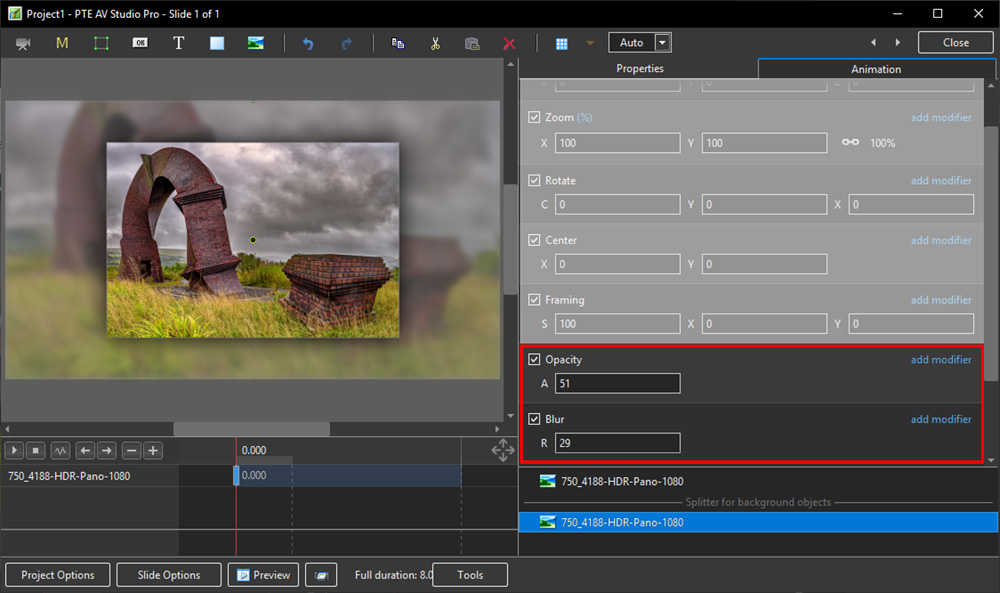
- The following Illustration shows the same Background Image with reduced Opacity and a little Blur
Parameter Controls
Display Mode for Pan and Zoom
Click on the “%” sign or the “100%” sign:
- “%” = Percentage Mode
- “px” = Pixels Mode
- “pt” = Original Points Mode
- “100%” = Full Height of Project Screen
- “Original Pixels” = The Original Pixel Size of the Image
The Illustration below shows a 640×480 rectangle at Original Size in a 1920×1080 Project
- In Percentage Mode:
- The values for “X” and “Y” Pan are calculated for the Centre of the Object/Rectangle with respect to the Centre of the Slide
- The value of the Zoom Parameter is the percentage of the Full Height of the Project Screen (in this case 1080 pixels)
- 480/1080= 0.44444444444 = 44.44444444%
- In Pixels Mode:
- The values for “X” and “Y” Pan are calculated for the Top Left Corner of the Object/Rectangle with respect to the Top Left Corner of the Slide
- The value of the Zoom Parameter is the Pixel Size of the Object/Rectangle
- In Points Mode
The Centre Control
- The “CENTRE” Control can be used to move the CENTRE or “Point of Rotation” of an Object as shown below:
The Rotate Control
- The “Rotate C” Control will rotate an Object about its Centre Point in the same plane as the screen:
- The “Rotate Y” Control will rotate an Object about its Centre Point in 3 Dimensions Horizontally:
- The “Rotate X” Control will rotate an Object about its Centre Point in 3 Dimensions Vertically:
- The “C”, “Y” and “X” Rotate Controls can be used simultaneously:
Changing Parameters with the Mouse
- Place the Mouse on any Letter (e.g. X,Y or Z in the Pan Controls) and click and drag left or Right
- You can also Right Click on any Letter and access commonly used Preset Values (See Right Click Menus below)
- You can “double click” on any letter to change the value back to its default state
Keyboard Entry
- In any box, highlight the existing value and type in a new value
OR Place the cursor in a box and:
- UP arrow on Keyboard increases the value by one unit
- DOWN arrow decreases the value by one unit
- Pg Up on Keyboard increases the value by ten units
- Pg Dn on Keyboard decreases the value by ten units
The UNITS depend on the chosen Display Mode:
- In % Mode the units will increase/decrease by 1% or 10% of the Parent Frame (or Background)
- In Px Mode the units will increase/decrease by 1 Pixel or 10 Pixels - relative to Project Size
- In Pt Mode the units will increase/decrease by 1 Pixel or 10 Pixels relative to the Original size of the Object
Pan
- The parameters can be read in Percentage, Pixels or Original Points
- X - Horizontal movement of the Object relative to the width of the Object's Parent Frame
- Y - Vertical movement of the Object relative to the height of the Object's Parent Frame
- Z - Zoom - “Closer to” or “further away from” the viewer
Zoom
- The parameters can be read in Percentage, Pixels or Original Points
- X - The horizontal dimension relative to the native size/resolution of the Object's Parent Frame
- Y - The vertical dimension relative to the native size/resolution of the Object's Parent Frame
- With the “Chain Link” deselected the object can be distorted
- With the “Chain Link” restored the distorted image/object can be scaled
- Shift Click and Drag on the “bounding box” will temporarily “unlink” the X and Y parameters and allow the object to be “distorted”
- Click on 100% to return to default settings (100%)
The UNITS depend on the chosen Display Mode:
- In % Mode 100% = 100% of the Parent (Slide / Frame etc)
- In Px Mode the Pixel Dimensions of the Object are shown
- In Pt Mode 100% = 100% of the Native Pixels of the Object
The Right Click Menus for X, Y and Z
Framing
- Framing can be used to Pan and/or Zoom an Image within a Frame without modifying the frame itself
- Framing can also be used to adjust an Aspect Ratio mismatch
- In the example below a 4:3 image is shown within a 3:2 frame at 90% of full screen in a 16:9 Project.
- In the default 100% Scaling (S) the 4:3 Image has been “cut off” at the top and bottom of the Image and “Fits” the Width of the 3:2 Frame.
- By adjusting the “S”, “X” and “Y” Controls a “Best Fit” composition can be achieved
- Further Panning and Zooming is possible
Opacity and Blur
- The Illustration shows Main Image used as a Background Image at 100% Opacity and Zero Blur
- The following Illustration shows the same Background Image with reduced Opacity and a little Blur
Modifiers
- Modifiers can be applied to an Animation of an Object / Image between two Key Frames
- The Modifier is applied to the first Key Fame of a pair of Key Frames defining the animation
- Click on “Modifier”
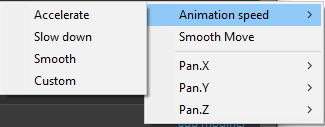
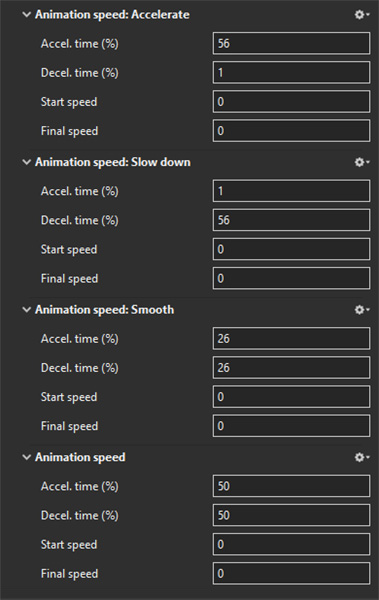
- The drop-down shows a number of options, the first being Animation Speed
- Acceleration - the animation starts “slowly” and builds up to a maximum
- Slow Down - the animation starts at maximum speed and finishes smoothly
- Smooth - Starts an ends smoothly, with the maximum speed in the middle
- Custom - Linear Acceleration to the Middle of the animation and Linear Deceleration to the finish - a starting point for a Custom Setting
Smooth Move
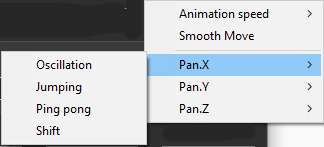
- Pan, Zoom, Rotate etc all have a set of modifiers labelled:
- Oscillation
- Jumping
- Ping Pong
- Shift
- The following Video demonstrates the various Modifiers
Colour Correction
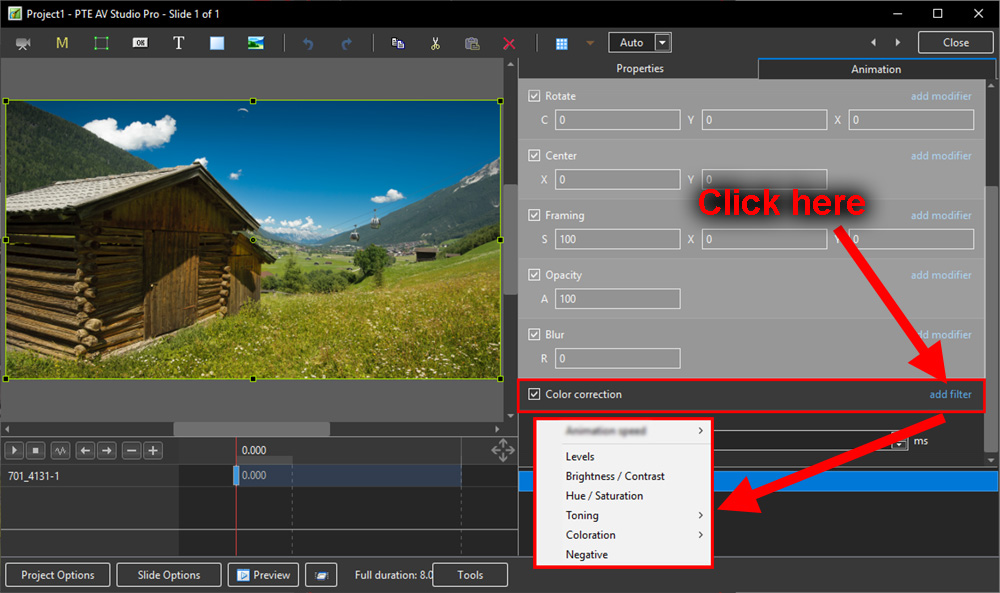
- Click on “Add Filter” to display a list of available Colour Correction Adjustments:
The available Adjustments are:
- Levels
- Brightness / Contrast
- Hue / Saturation
- Toning
- Colouration
- Negative
Levels
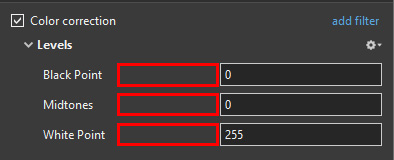
- The Adjustments:
- Click and drag within the area outlined to the Left and / or Right to change the value of the adjustment
- Values can be entered directly via the keyboard
- Increasing the Black Point and decreasing he White Point will apply Contrast to the Object / Image
- Increasing / Decreasing the Midtones will Lighten / Darken the Object / Image
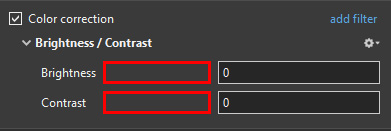
Brightness / Contrast
- The Adjustments:
- Click and drag within the area outlined to the Left and / or Right to change the value of the adjustment
- Values can be entered directly via the keyboard
- Drag to the Left / Right to Decrease / Increase Brightness
- Drag to the Left / Right to Decrease / Increase Contrast
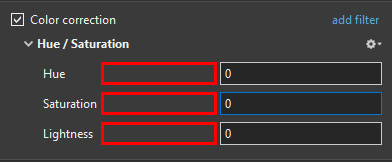
Hue / Saturation
- The Adjustments:
- Click and drag within the area outlined to the Left and / or Right to change the value of the adjustment
- Values can be entered directly via the keyboard
- Drag to the Left / Right to change the Hue
- Drag to the Left / Right to Desaturate / Saturate the Object / Image
- Drag to the Left / Right to Darken / Lighten the Object / Image
Toning
- The Adjustments:
- Choose from Grayscale, Sepia or Cyan
- Click and drag within the area outlined to the Left and / or Right to change the value of the adjustment
- Values can be entered directly via the keyboard
- Click on the Colour /Grayscale to open the Choose Colour Box and change the Tone
- Drag the Amount Slider to the Left to Decrease the Effect
Colouration
- The Adjustments:
- Choose from Red, Green or Blue
- Click and drag within the area outlined to the Left and / or Right to change the value of the adjustment
- Values can be entered directly via the keyboard
- Click on the Colour to open the Choose Colour Box and change the Tone
- Drag the Amount Slider to the Left to Decrease the Effect
Negative
- No Adjustments
- Creates a Negative version of the Object / Image
- Combine with Grayscale Toning or Desaturation to make a Black and White Negative from a Colour Image
- Can also be used for “Inverting a Mask” (with “Convert to Alpha Image” unticked)
Key-frame Time
en-us/11.0/objectsandanimation_1/animation_tab.1675945567.txt.gz · Last modified: 2023/02/09 12:26 by davegee
Except where otherwise noted, content on this wiki is licensed under the following license: CC Attribution-Noncommercial-Share Alike 4.0 International
