Sidebar
This is an old revision of the document!
Table of Contents
Schermata Oggetti e animazione
Premere “Ctrl+F5” regolarmente per aggiornare
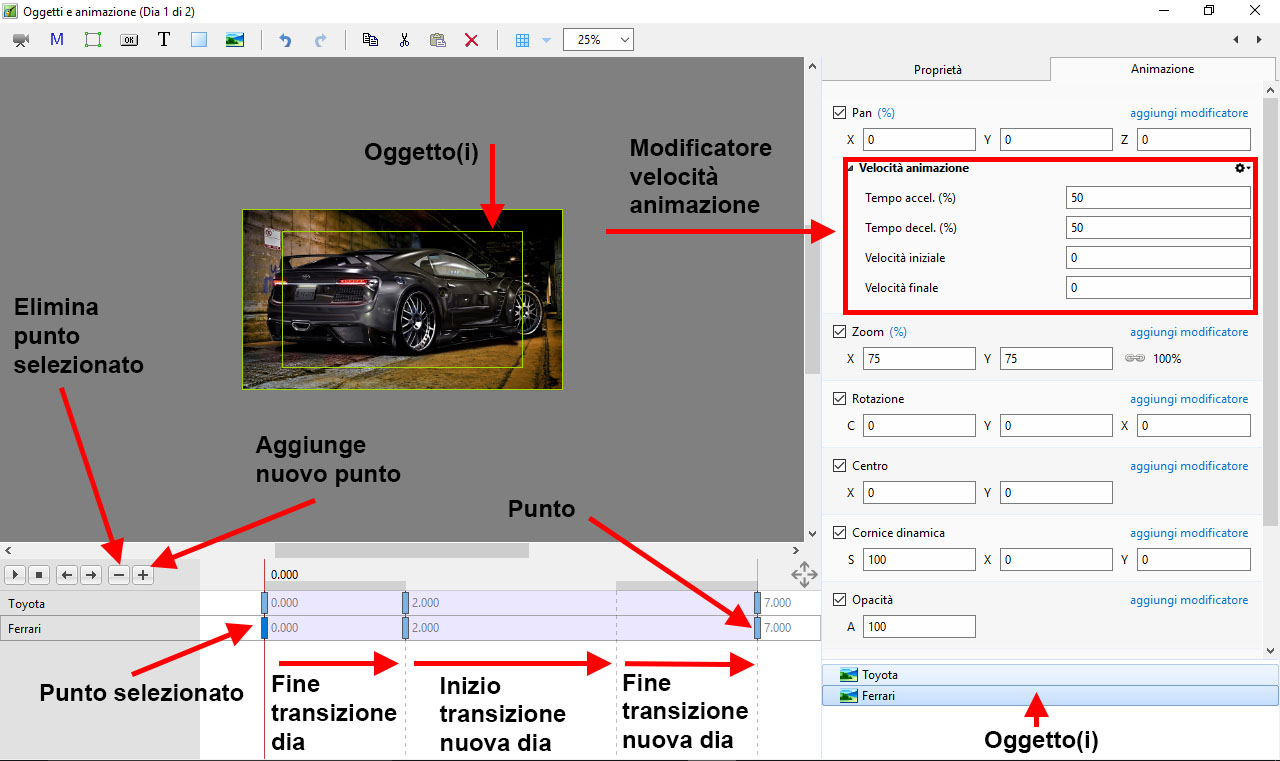
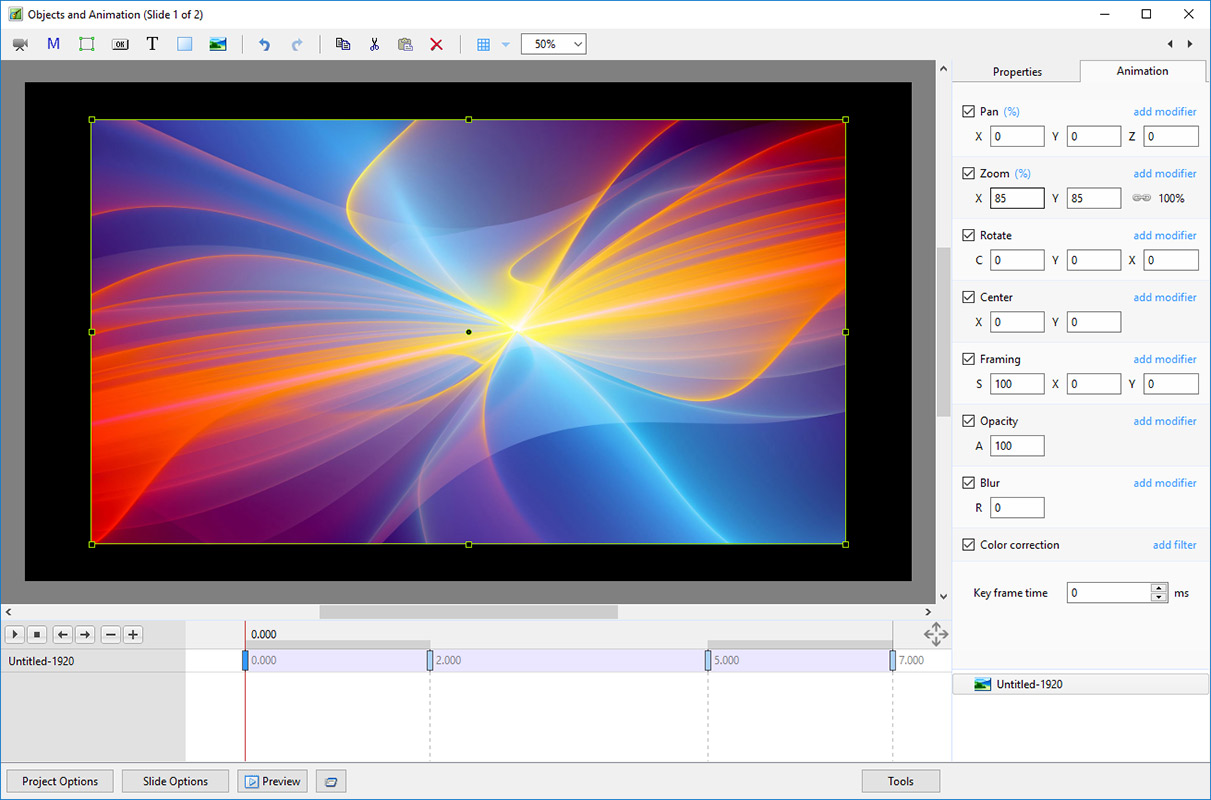
Quando una nuova immagine (o un nuovo oggetto) è aggiunta nello schermo Oggetti e animazione essa dispone di un solo punto (key frame).
Proprietà di un punto
- I parametri della scheda Proprietà sono impostati globalmente per tutti i punti in una traccia oggetto
- I parametri della scheda Animazione possono essere impostati per ciascun singolo punto in una traccia oggetto
Larghezza/Spessore punto
- La larghezza di un punto può essere preimpostata in Impostazioni/Preferenze/Editor
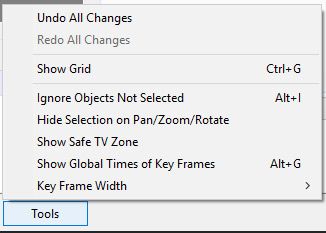
- Inoltre può essere cambiata nel menu Strumenti in Oggetti e animazione
Duplicare un punto
- Si fa clic destro su un punto e si sceglie dal menu di contesto Duplica punto
- Si veda il menu di contesto (clic destro) nell’illustrazione seguente
Aggiungere un punto
- Si seleziona il primo punto e si fa clic sul pulsante ”+”
- Un secondo punto viene aggiunto alla Durata totale diapositiva
- Si seleziona di nuovo il primo punto e si fa clic sul pulsante”+”
- Un altro punto viene aggiunto a metà strada tra il primo e l’ultimo punto
- Facendo clic su un punto qualsiasi e poi sul pulsante ”+” verrà aggiunto un altro punto a metà strada tra questo punto e il successivo
- Aggiungendo punti mediante il pulsante ”+” si aggiunge un punto vuoto (ogni proprietà Animazione è disattivata)
- Facendo clic in qualsiasi zona della timeline Oggetti e animazione al di fuori di un punto e facendo clic sul pulsante ”+” verrà aggiunto un punto con le proprietà Animazione disattivate
Creare un semplice Pan
Spostare un punto
- Si fa clic su un punto e lo si trascina verso destra o sinistra per cambiare la sua posizione, oppure ……..
- Si inserisce un preciso Tempo punto nel formato “5.000”
- Si seleziona un punto e si fa clic sul pulsante ”-” per eliminare il punto
Selezionare più oggetti e punti
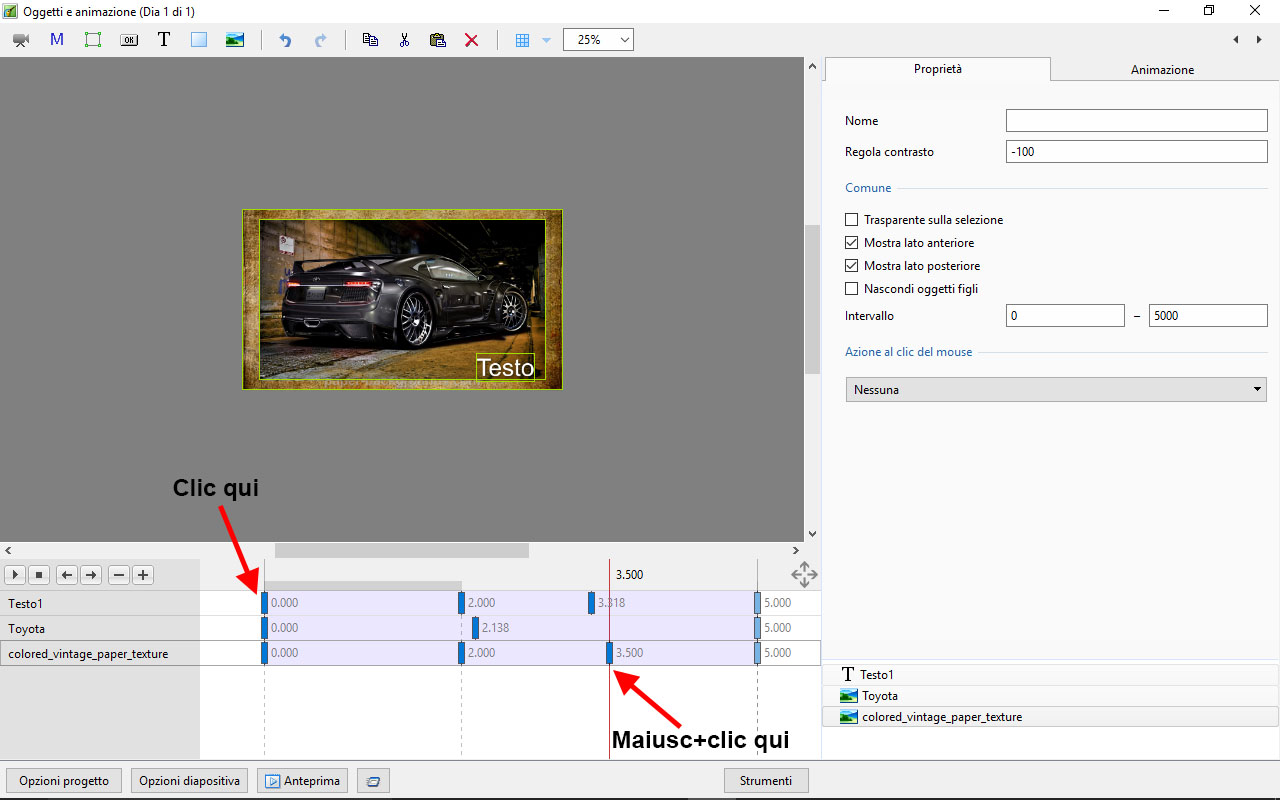
- Ctrl+Clic su più punti (non contigui) in più timeline
- Si selezionano più punti con lo stesso Tempo punto facendo clic su un qualsiasi punto e poi si fa clic destro e nel menu di contesto si sceglie “Seleziona punti al tempo corrente”
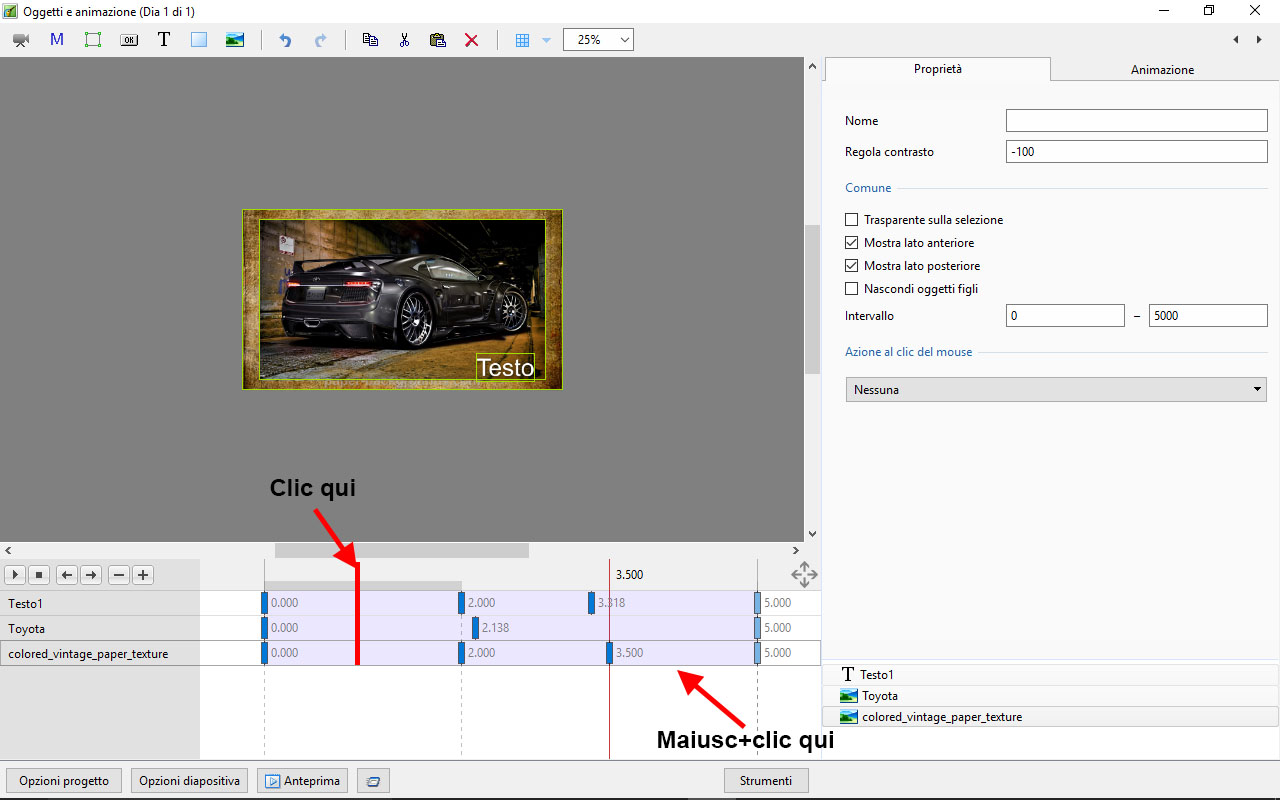
- Si fa clic sul primo punto e Maiusc+Clic sull’ultimo punto in più tracce
- Si fa clic sulla prima traccia tra i punti e Maiusc+Clic sull’ultima traccia tra i punti per selezionare tutti i punti tra queste due posizioni
La differenza tra aggiungere e duplicare un punto
- Quando un punto è duplicato tutti i parametri del punto originale sono clonati nel punto duplicato
- Quando un punto è aggiunto tutti i parametri sono vuoti e quindi solo i parametri selezionati cambieranno
Esempio: Per applicare a un’immagine una panoramica da sinistra verso destra è possibile clonare un punto e trascinare l’immagine dalla sua posizione iniziale a quella finale. È possibile volere regolare la Saturazione nel mezzo della panoramica. Aggiungendo un punto vuoto è possibile attivare il filtro Correzione colore e fare le necessarie regolazioni senza influenzare la natura della panoramica.
Modo di visualizzazione per Pan e Zoom
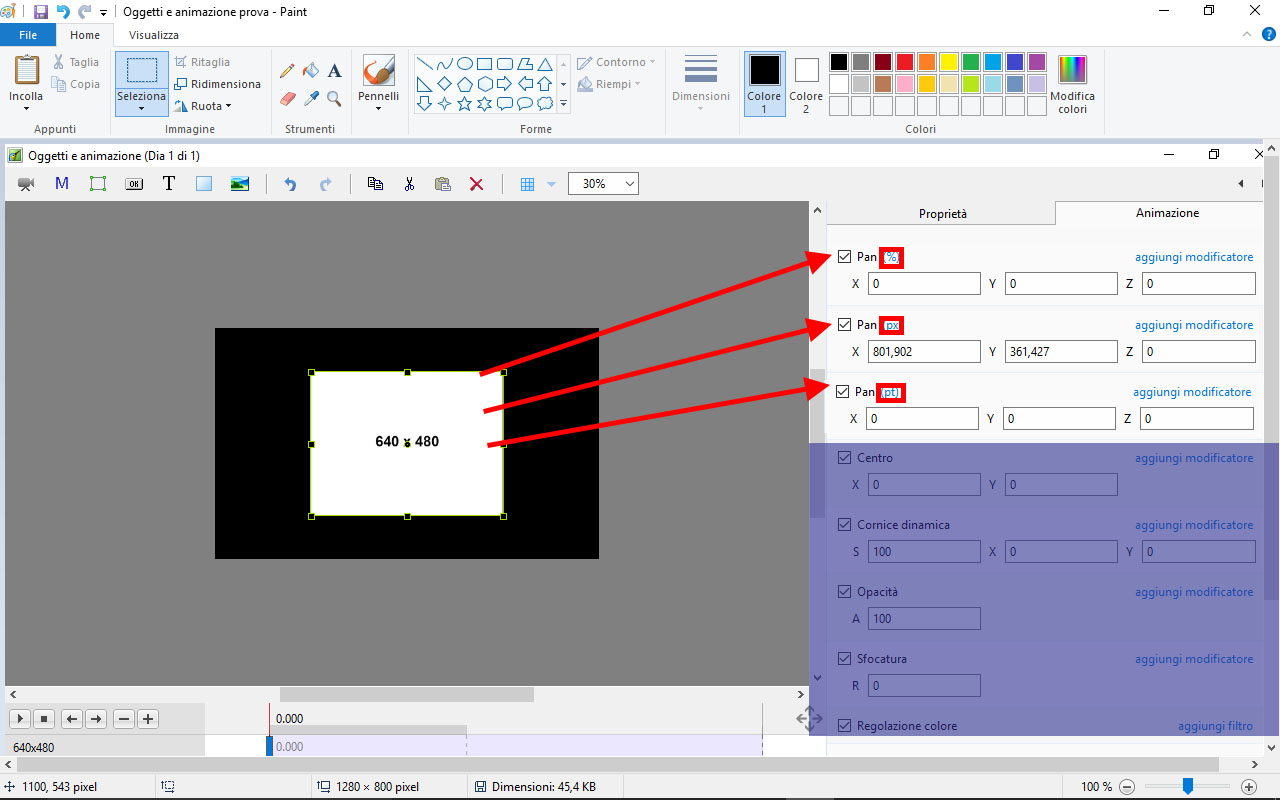
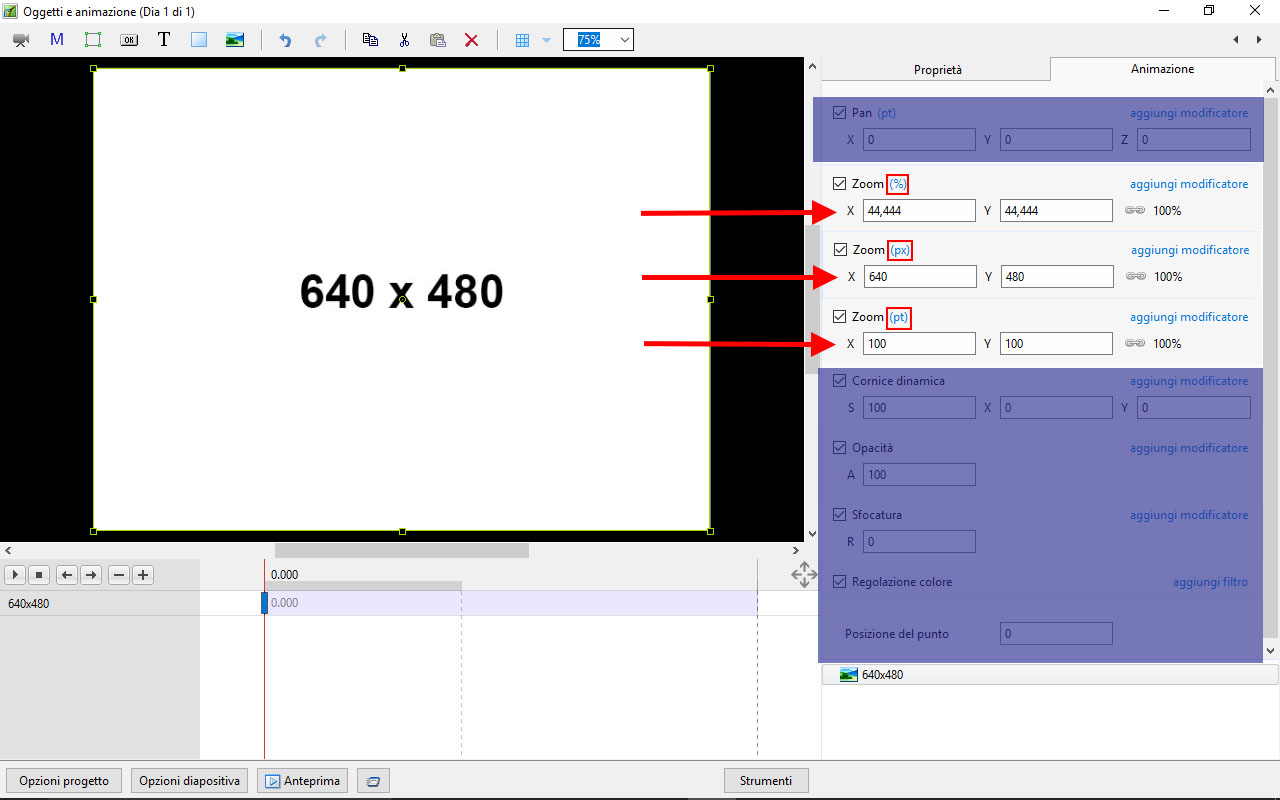
- I valori di Pan e Zoom possono essere letti in Percentuale (%), Pixel (px) o Modo originale
- Si fa clic sui simboli ”%” o “px” per eseguire la scelta
- Si fa clic su 100% in Zoom per scegliere Dimensione originale (Pixel Originali/Reali)
Percentuale / Pixel / Punti
In Pan:
- Nel modo “Percentuale” i valori “x” e “y” sono visualizzati dal punto centrale dell’oggetto rispetto al punto centrale del suo genitore
- Nel modo “Pixel” i valori “x” e “y” sono visualizzati dall’angolo superiore sinistro dell’oggetto rispetto all’angolo superiore sinistro del suo genitore
- Nel modo “Punti originali” i valori “x” e “y” sono visualizzati dal punto centrale dell’oggetto rispetto al punto centrale del suo genitore
In Zoom:
- Nel modo “Percentuale” i valori “x” e “y” sono calcolati rispetto al genitore
- Nel modo “Pixel” i valori “x” e “y” sono i “Pixel reali” dell’oggetto dopo l’applicazione di qualsiasi zoom
- Nel modo “Punti originali” i valori “x” e “y” sono le dimensioni percentuali rispetto alle dimensioni in pixel originali dell’oggetto
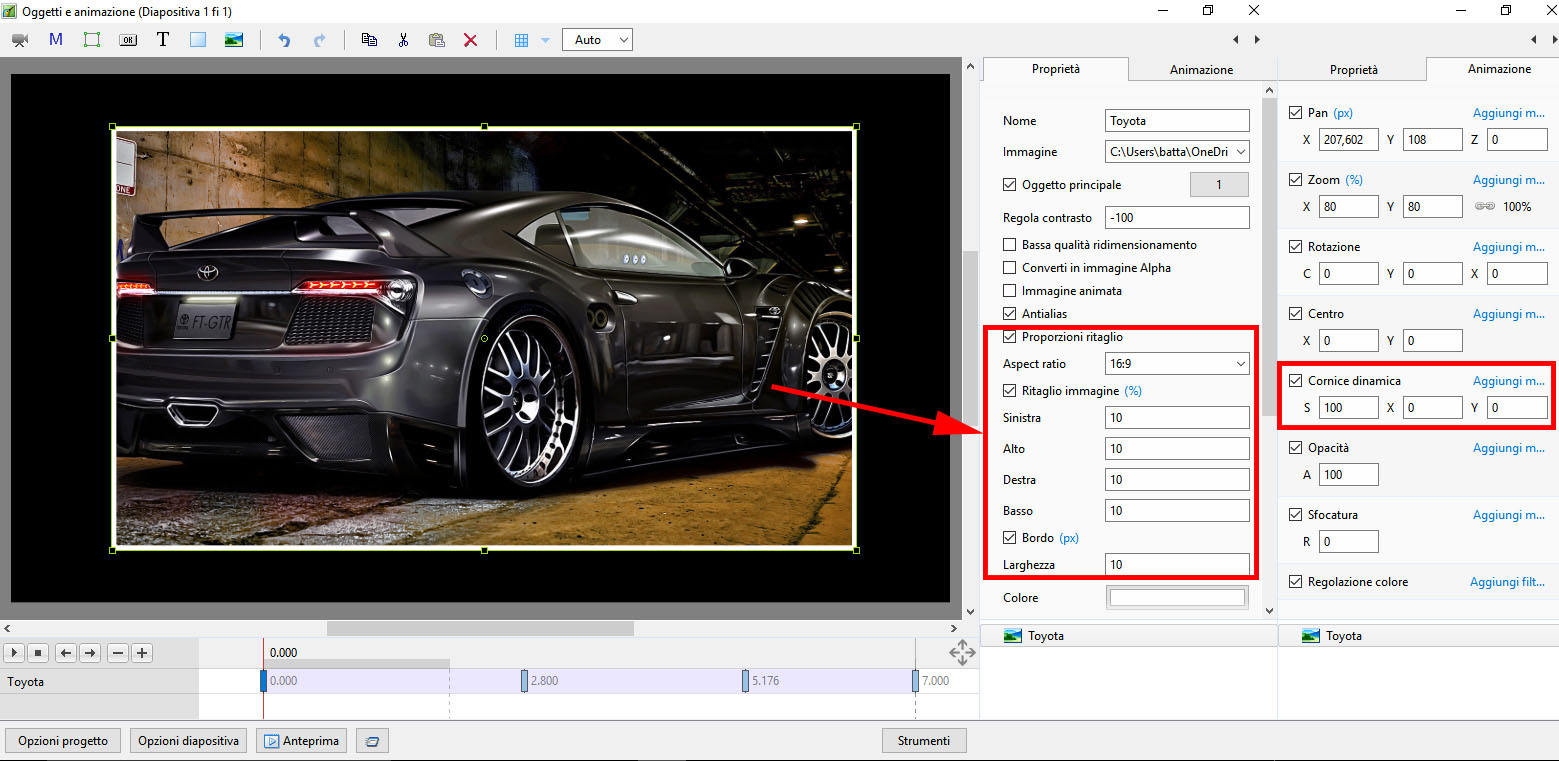
Cornice dinamica
- S = Scala
- X = Offset asse X
- Y = Offset asse Y
- Si usa insieme ai controlli Bordo e Proporzioni Ritaglio nella scheda Proprietà
- S, X e Y possono essere impostati per Punti con Zoom e Pan, ecc.
- Si sceglie un Aspect Ratio per l’immagine in Proprietà / Proporzioni ritaglio
- Si sceglie una Larghezza bordo in Proprietà / Bordo
- In Animazione / Cornice dinamica si usa il cursore Scala (S) per applicare lo zoom avanti o indietro all’immagine all’interno della cornice
- Si usano i cursori Offset X e Y per riposizionare l’immagine nella cornice
- La dimensione della cornice può essere regolata usando il cursore Zoom
- I controlli Scala, Offset e Zoom possono poi essere impostati per singoli punti per fornire un’animazione alla cornice e al suo contenuto
Il menu clic destro (di contesto)
- The Right Click Menu enables options to add Key Frames
- If an existing Key Frame is selected “Add Key Frame Here” will add a Blank KF in the same way as the “+” Button with all Animation Properties turned off
- If the Cursor is selected between KF the “Add Key Frame Here” will add a Blank KF at that point with all Animation Properties turned off
- “Clone KF” will clone the selected KF
- Delete KF will delete the selected KF
- “Select KF at Current Time” will select all KF in Multiple Objects at the selected time
- Play / Stop - Ctrl+P at selected Time
The Properties Tab
- Object Name - can be changed
- File Name - Path and File Name - Object can be changed
- Main Object - Choose a number - for use with Styles
- Sharper (-) / Smoother (+) - Default value is (-100)
- Low quality of re-sizing
- Convert to Alpha Image
- Animated Image
- Edge Anti-Aliasing
- Aspect Ratio Crop - Crop to a specific Aspect Ratio using drop-down menu
- Image Crop (Percentage or Pixels) - Crop pixels (or %) from Left, Top, Right or Bottom of the Object
- Border Width and Colour (Percentage or Pixels) - Add a border of any colour to the Object in Pixels (or %)
- Transparent to Selection - prevents selection of the Object using the Mouse
- Show Front Side - in 3D animation determines if the Front of the Image is seen or hidden
- Show Back Side - in 3D animation determines if the Back of the Image is seen or hidden
- Hide Child Objects
- Shadow
- Fit Mode - Choose “Fit” or “Cover”
- Time Range - Choose the points between which the Image/Object shows (depending on the setting of Opacity)
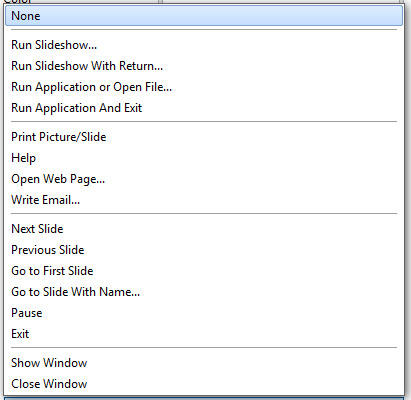
- Action on Mouse Click:
The Animation Tab
Changing Parameters with the Mouse
- Place the Mouse on any Letter (e.g. X,Y or Z in the Pan Controls) and click and drag left or Right
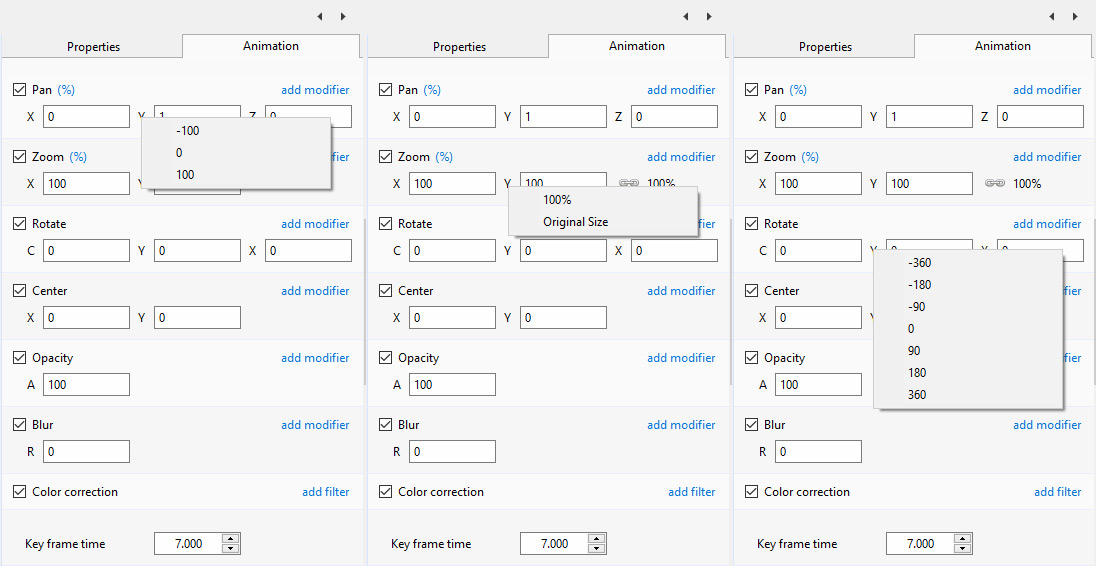
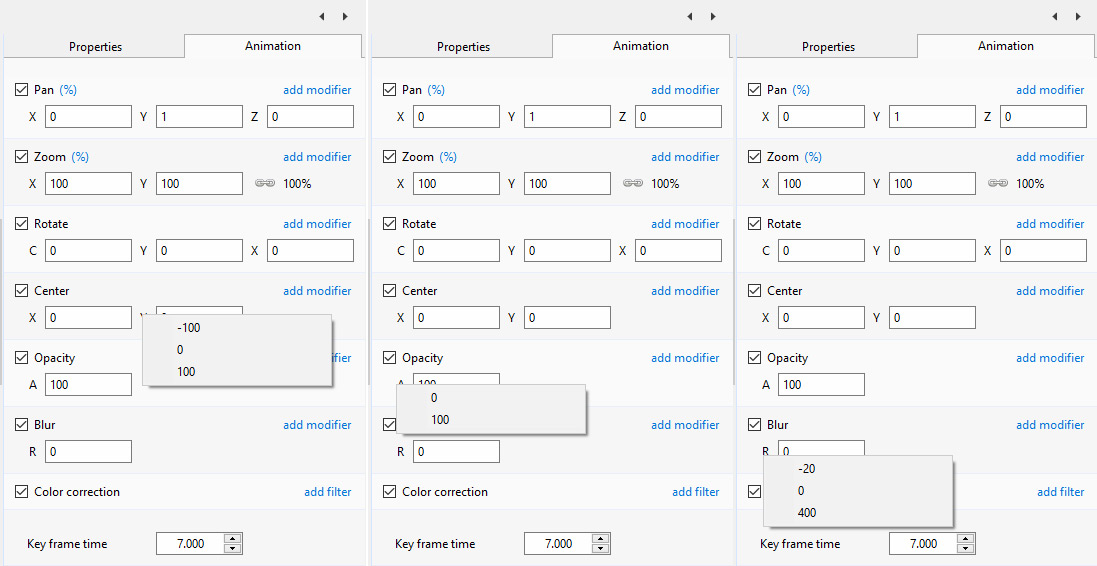
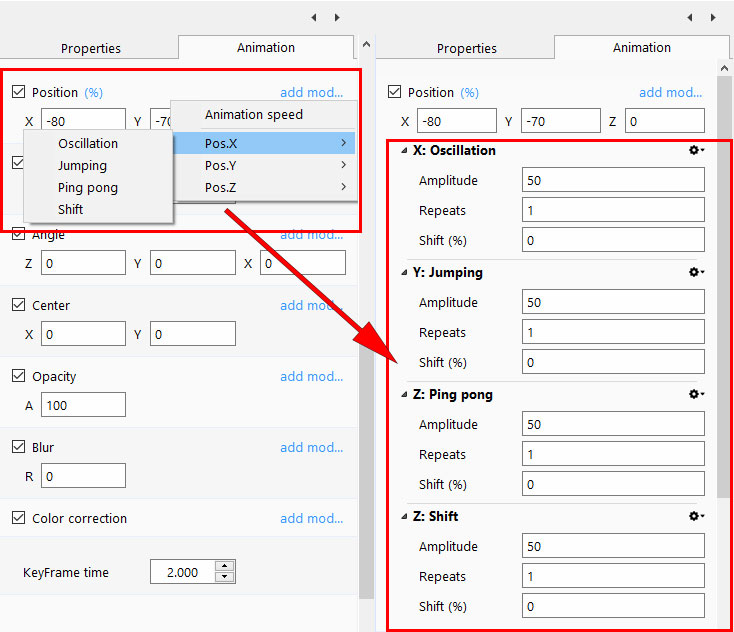
- You can also Right Click on any Letter and access commonly used Preset Values (See Right Click Menus below)
- You can “double click” on any letter to change the value back to its default state
Keyboard Entry
- In any box, highlight the existing value and type in a new value
OR Place the cursor in a box and:
- UP arrow on Keyboard increases the value by one unit
- DOWN arrow decreases the value by one unit
- Pg Up on Keyboard increases the value by ten units
- Pg Dn on Keyboard decreases the value by ten units
The UNITS depend on the chosen Display Mode:
- In % Mode the units will increase/decrease by 1% or 10% of the Parent Frame (or Background)
- In Px Mode the units will increase/decrease by 1 Pixel or 10 Pixels - relative to Project Size
- In Pt Mode the units will increase/decrease by 1 Pixel or 10 Pixels relative to the Original size of the Object
Pan
- The parameters can be read in Percentage, Pixels or Original Points
- X - Horizontal movement of the Object relative to the width of the Object's Parent Frame
- Y - Vertical movement of the Object relative to the height of the Object's Parent Frame
- Z - Zoom - “Closer to” or “further away from” the viewer
Zoom
- The parameters can be read in Percentage, Pixels or Original Points
- X - The horizontal dimension relative to the native size/resolution of the Object's Parent Frame
- Y - The vertical dimension relative to the native size/resolution of the Object's Parent Frame
- With the “Chain Link” deselected the object can be distorted
- With the “Chain Link” restored the distorted image/object can be scaled
- Click on 100% to return to default settings (100%)
The UNITS depend on the chosen Display Mode:
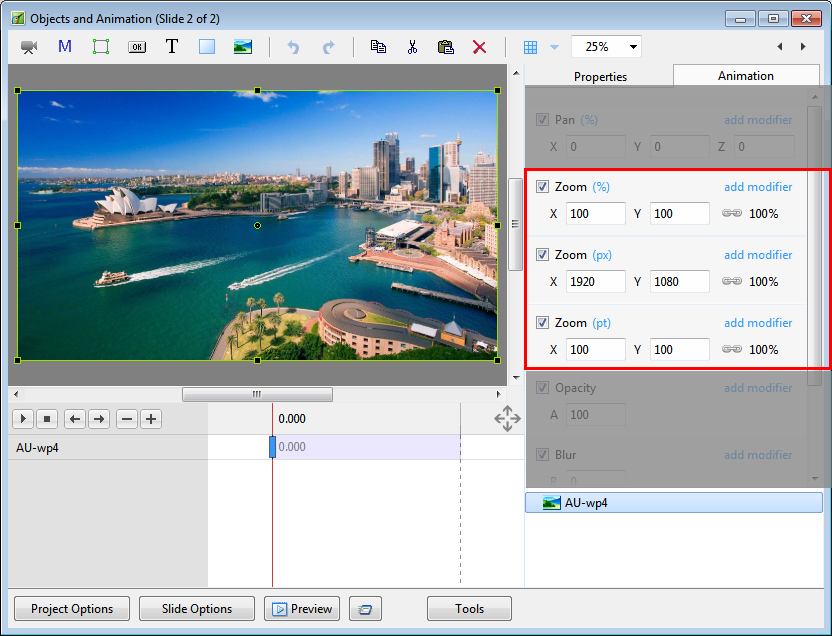
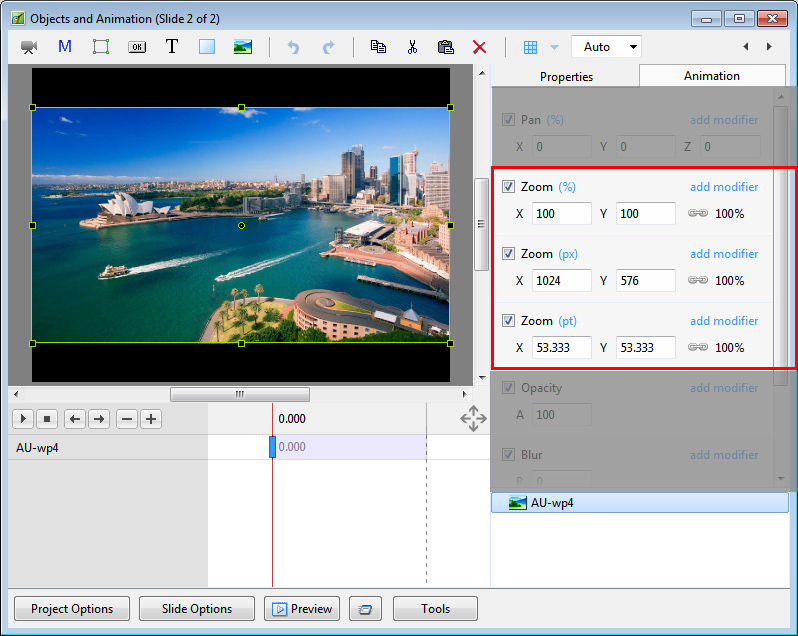
- In % Mode 100% = 100% of the Parent (Slide / Frame etc)
- In Px Mode the Pixel Dimensions of the Object are shown
- In Pt Mode 100% = 100% of the Native Pixels of the Object
Examples
The first example shows a 1920×1080 Image inserted into a (default) 16:9 - 1920×1080 Project. Note the values for the %, Px and Pt Modes in the Zoom Box.
The next example shows the same 1920×1080 Image inserted into a 4:3 - 1024×768 Project. Note the values for the %, Px and Pt Modes in the Zoom Box.
Rotate
- Z - Rotate the Object about the Centre Point
- Y - Revolve about the Vertical Axis Centre Point
- X - Revolve about the Horizontal Axis Centre Point
Centre
- X - The horizontal Centre of Rotation of the Object relative to the Centre of the Object's Parent (%)
- Y - The vertical Centre of Rotation of the Object relative to the Centre of the Object's Parent (%)
Opacity
- A - The Opacity of the Object (%)
Blur
- R - The Radius of the amount of Blur (+) or Sharpening (-) applied to the Object
The Right Click Menus for X, Y and Z
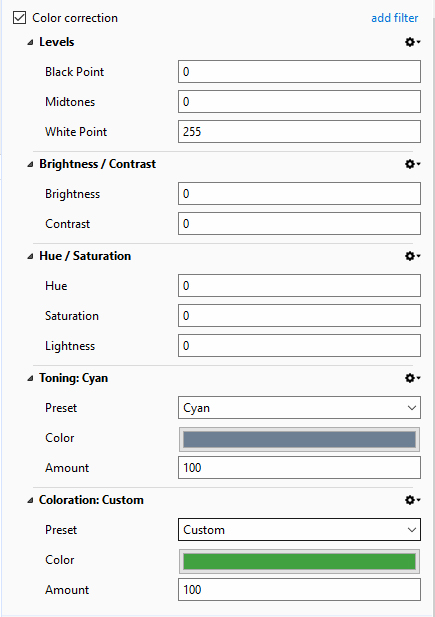
Colour Correction
Levels
- Black Point - Adjust the Black Point
- Mid Tones - Adjust the Mid Point or Gamma
- White Point - Adjust the White Point
Brightness / Contrast
- Brightness - Adjust the Brightness of the Object
- Contrast - Adjust the Contrast of the Object
Hue / Saturation
- Hue - Adjust the Hue of the Object
- Saturation - Adjust the Saturation of the Object
- Lightness - Adjust the Lightness of the Object
Toning
- Preset - Presently Cyan and Custom
- Colour - Colour Picker
- Amount - Fade the effect of the Toning
Coloration
Duplicate of Toning
Key-Frame Time
- Time in seconds from the beginning of the slide (e.g. 5.000 = 5 seconds)
- Select Global Time - from beginning of project - in the Tools Menu
Modifiers
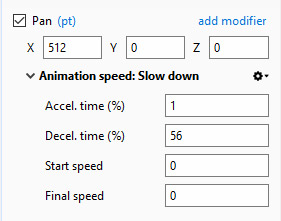
Animation Speed
- Acceleration Time and Deceleration Time can be set separately or together to produce the Speed Option effects of Version 8
- Combinations of Acceleration and Deceleration will produce an almost infinite number of “Smooth” Animation Speed Effects
- Start Impulse will either Slow Down (Negative values) or Speed Up (Positive values) the Start Phase of the Animation Speed set with Acceleration and Deceleration Times
- Final Braking will either Slow Down (Positive values) or Speed Up (Negative values) the Final Phase of the Animation Speed set with Acceleration and Deceleration Times
- “Bounce Effects” are possible by using Negative Values of either Start Impulse or Final Braking
X, Y and Z Effects
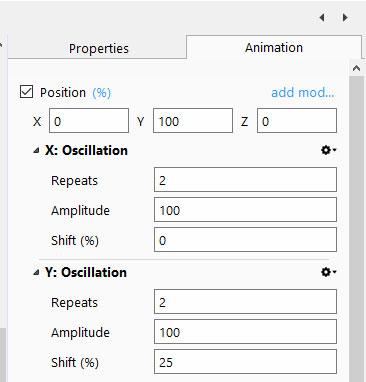
Oscillation
- Choose X, Y or Z and then click on Oscillation
- Amplitude = the Width (or Height) of the parent frame of the Object (Positive or Negative)
- Repeats = Number of Oscillations
- Shifts = Shifts the Centre of the Oscillation
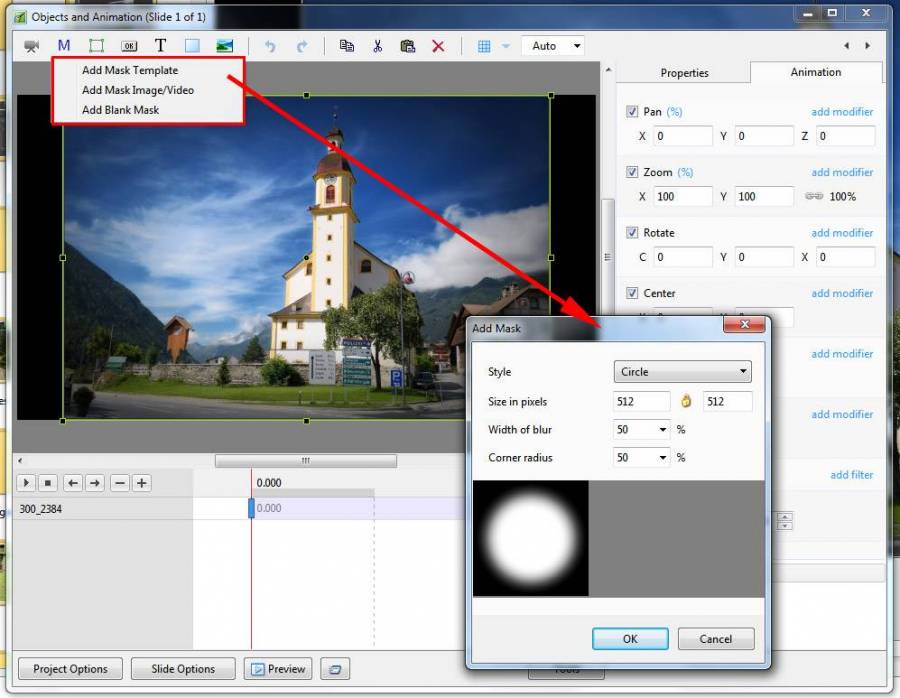
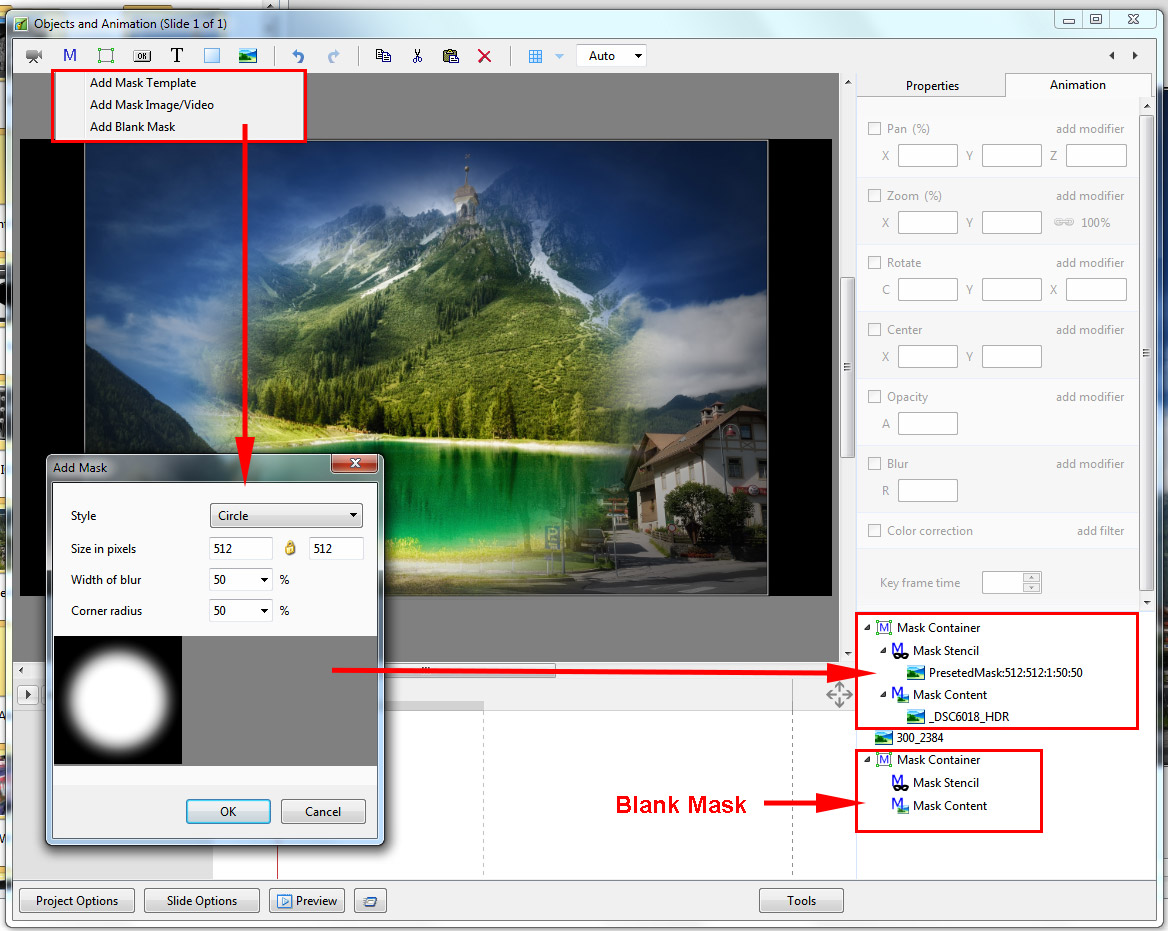
The Mask Menu
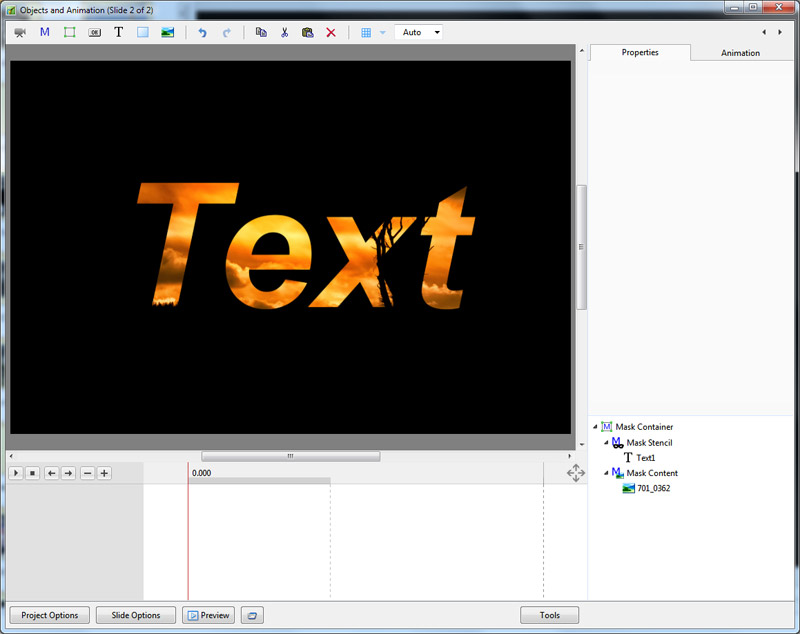
You can use any object as a masking layers in Mask Stencil container. For example, use a Text object as a mask.
Tools Menu
it-it/9.0/objects-and-animation/main.1488864859.txt.gz · Last modified: 2022/12/18 11:20 (external edit)
Except where otherwise noted, content on this wiki is licensed under the following license: CC Attribution-Noncommercial-Share Alike 4.0 International
