Sidebar
This is an old revision of the document!
Table of Contents
Finestra principale
Un consigliato flusso di lavoro per nuovi utenti e per utenti che si aggiornano alla versione 9
- Si consiglia di dare uno sguardo alle Preferenze nel menu Impostazioni. Usando le opzioni delle Preferenze è possibile ottimizzare progetti futuri. In particolare, è opportuno esaminare la sezione Barre strumenti delle Preferenze che determinano quali strumenti mostrare e quali tenere nascosti. Inoltre è possibile determinare dove sono posizionati gli strumenti nello spazio di lavoro.
- Le Opzioni progetto determinano le impostazioni per il progetto corrente. Nelle Opzioni progetto si impostano Aspect ratio e Risoluzione per il progetto. E' possibile ottimizzare diverse impostazioni prima di aggiungere immagini al progetto. E' anche possibile usare le Opzioni progetto per aggiungere e modificare file Audio nel progetto.
Finestra principale
Terminologia
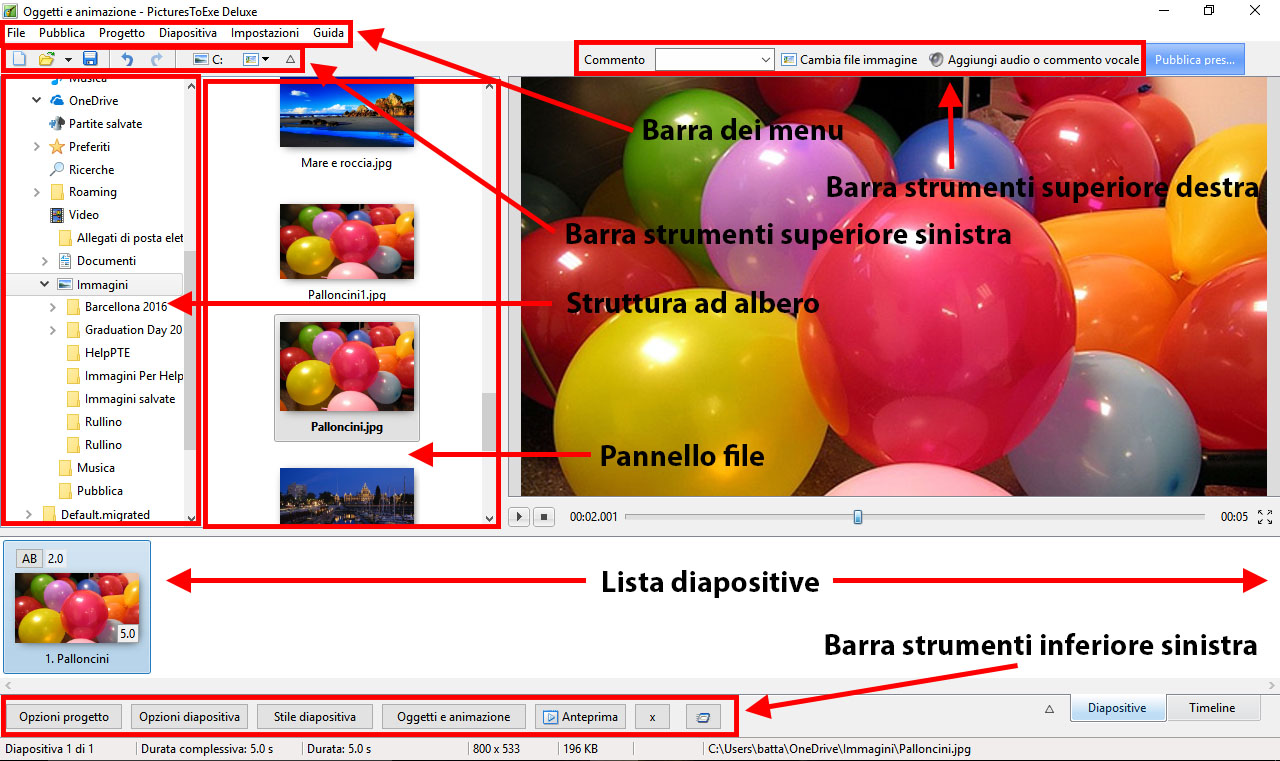
Gli esempi che seguono mostrano la posizione dei vari elementi della finestra principale. Si deve notare che è possibile configurare il posizionamento degli strumenti nelle varie Barre degli strumenti per adattarsi alle esigenze dell'utente e possono differire dalle Impostazioni strumenti predefinite. Si veda Preferenze / Barre strumenti.
- La Barra dei menu
- La Barra strumenti superiore sinistra
- La Barra strumenti superiore destra
- La Struttura ad albero
- Il Pannello file
- La Lista diapositive
- La Barra strumenti inferiore sinistra
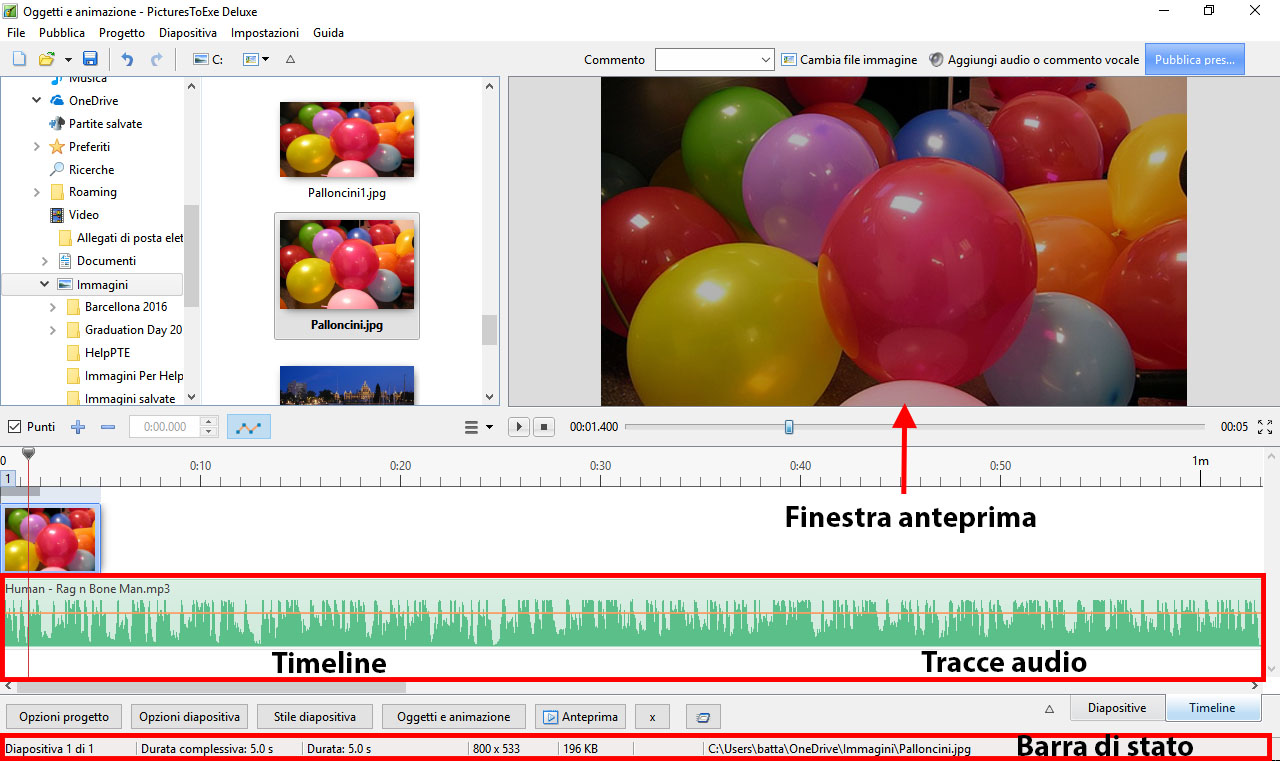
- La finestra Anteprima
- La Timeline
- Le Tracce audio
- La Barra di stato
Per avere maggiori informazioni sugli Strumenti e sulle Barre strumenti si veda Preferenze - Barre strumenti.
Per avere maggiori informazioni sulla Lista diapositive e su come aggiungere file immagine si veda Vista Lista diapositive più avanti.
Per avere maggiori informazioni sulla Timeline e su come aggiungere file audio si veda Vista Timeline più avanti.
Vista Lista diapositive
Panoramica sulla vista Lista diapositive
Aggiungere immagini dal Pannello file
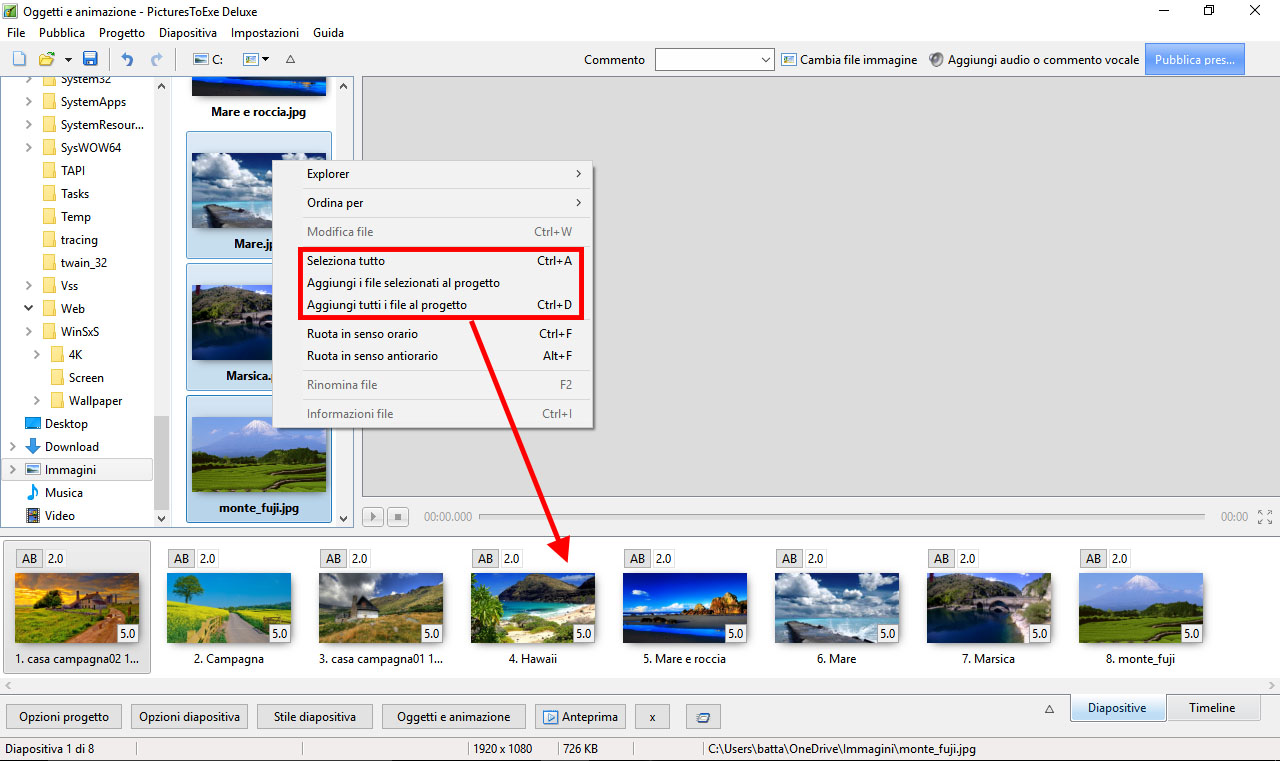
Nel Pannello file è possibile scegliere una singola immagini o più immagini e facendo clic destro sulla selezione è possibile scegliere di:
- Aggiungere i file selezionati al progetto
Aggiungere immagini per trascinamento
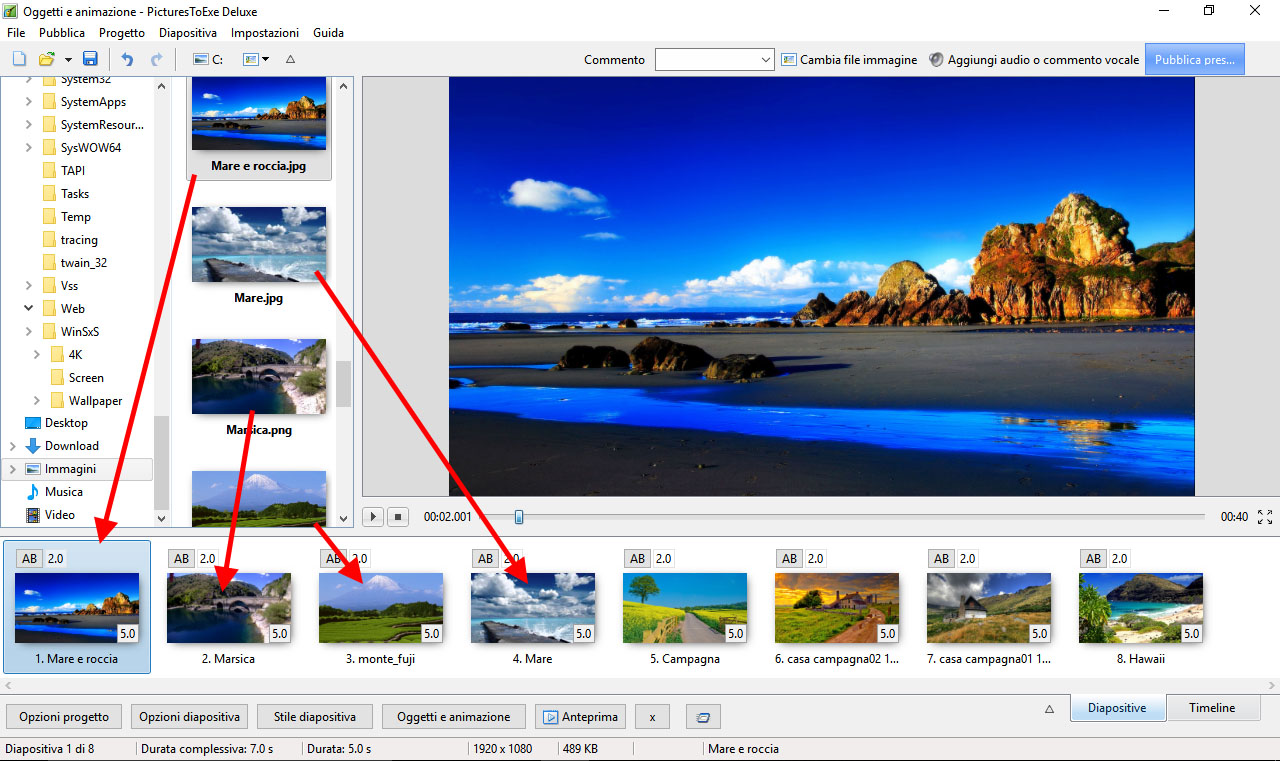
Nel pannello file è possibile scegliere una singola immagine o più immagini e poi trascinarle nella Lista diapositive:
Doppio clic
Nel Pannello file anche un doppio clic su una singola immagine aggiungerà questo file immagine al progetto (Lista diapositive).
Il tasto Invio
Il tasto Invio aggiungerà i file immagine selezionati al progetto (Lista diapositive
Aggiugere immagini dall'Explorer
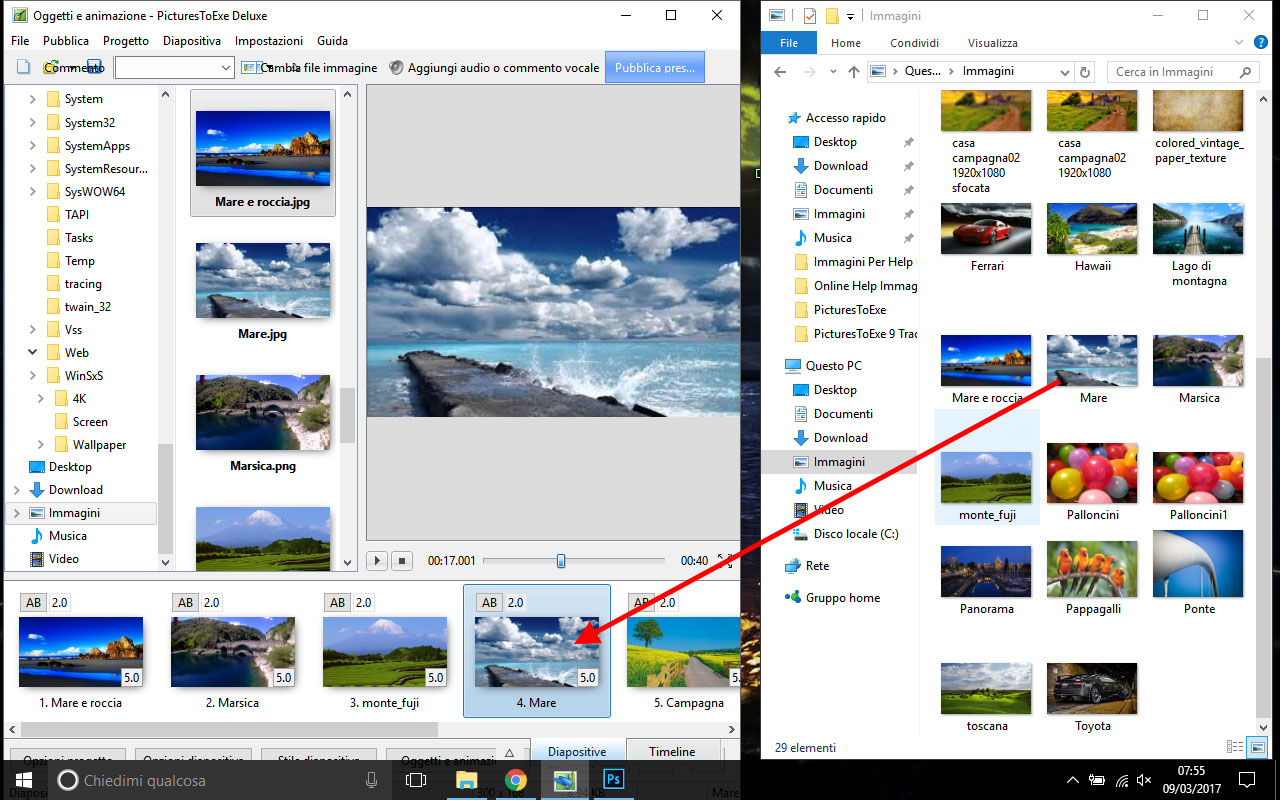
Nell'Explorer di Windows è possibile scegliere una o più immagini e poi trascinarle nella Lista diapositive:
Si veda anche:
Durate
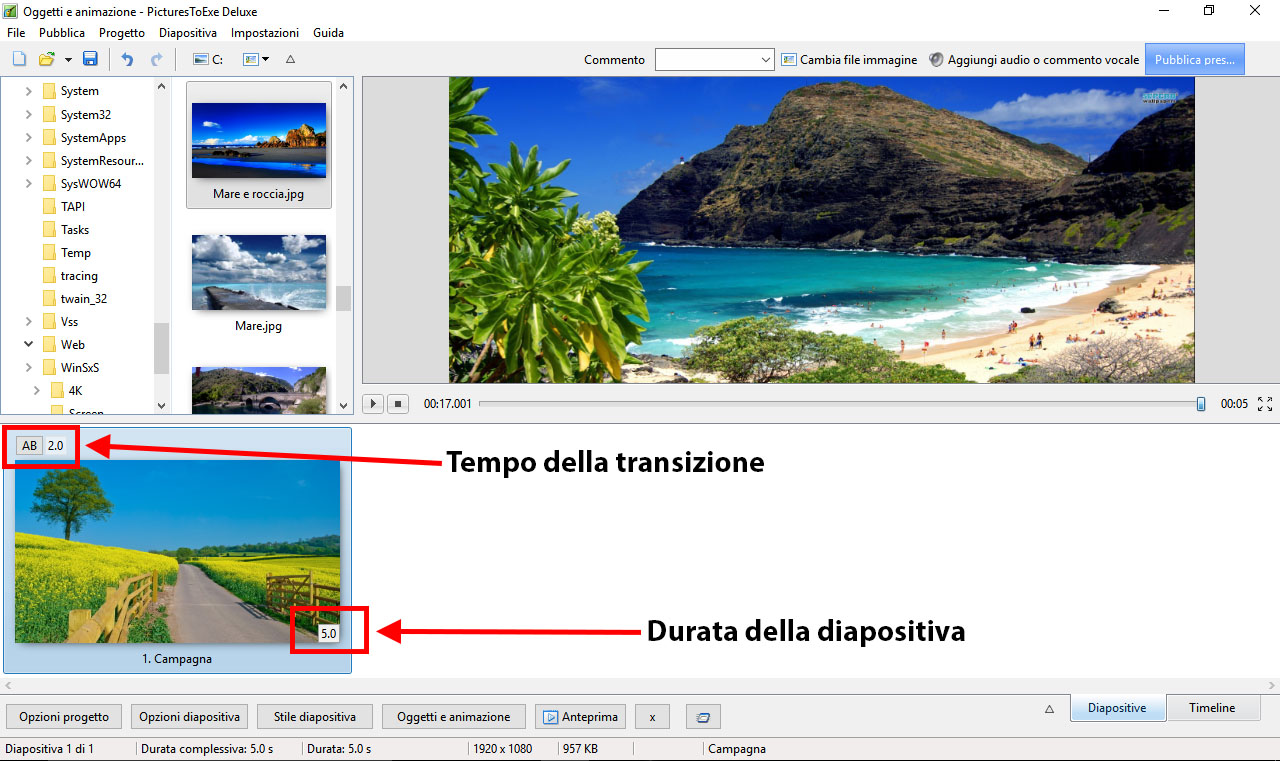
- Per cambiare tipo e durata predefiniti della transizione si va in Opzioni diapositiva / Transizione
- Per cambiare la durata predefinita della diapositiva si va in Opzioni diapositiva / Principale
- Il tipo e la durata predefiniti della transizione sono impostati in Opzioni progetto / Transizioni
- La durata diapositiva predefinita è impostata in Opzioni progetto / Principale
- Per avere maggiori informazioni sulla Durata diapositiva si veda Durata Diapositiva
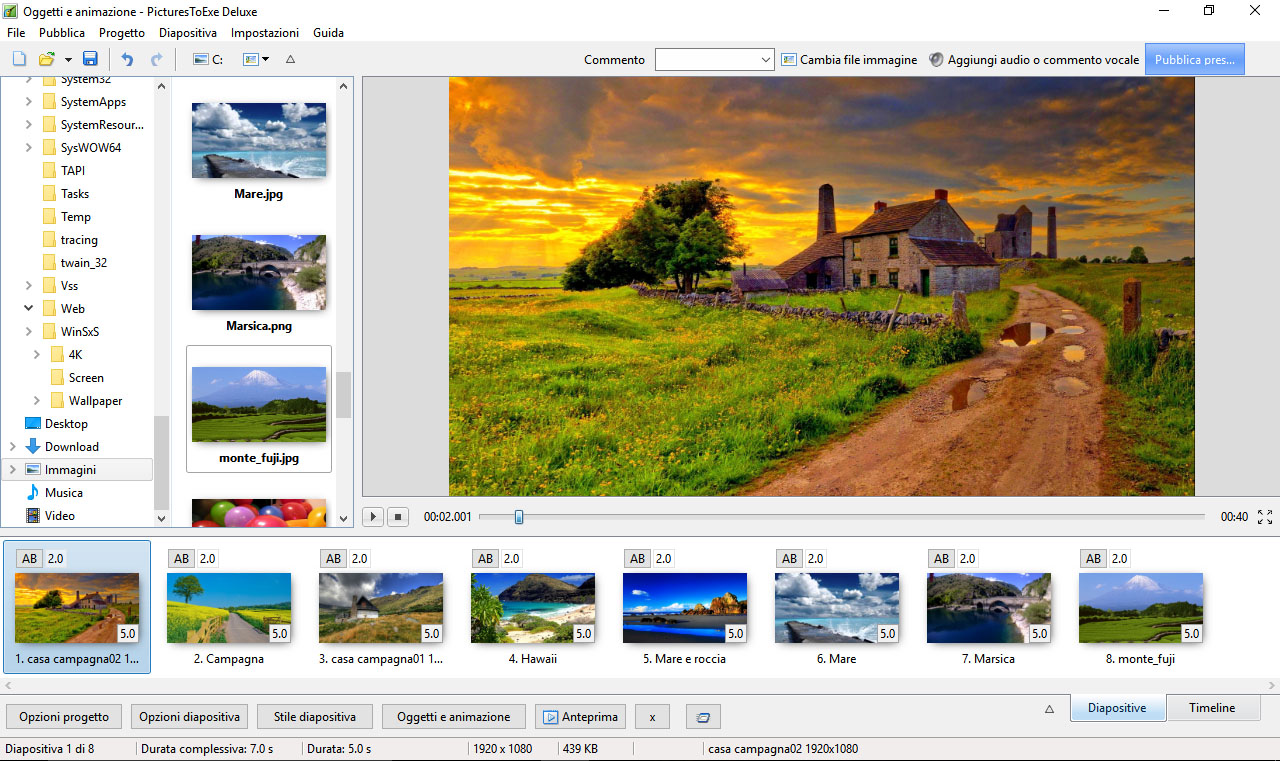
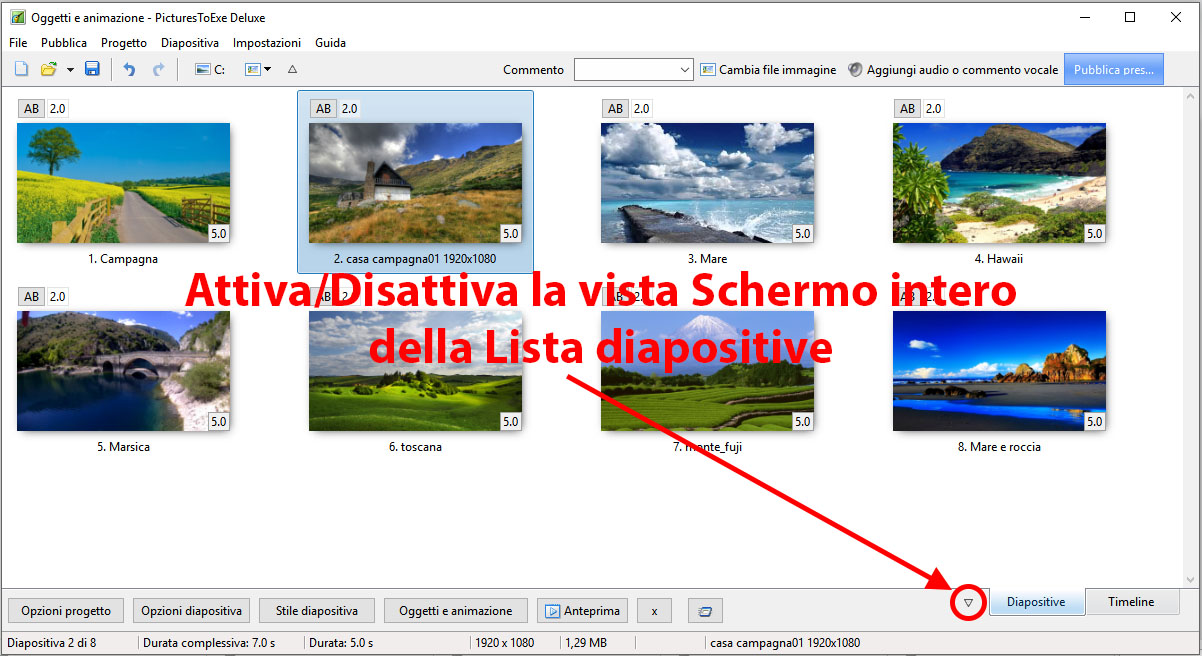
Vista Schermo intero della Lista diapositive
Il menu di contesto (clic destro)
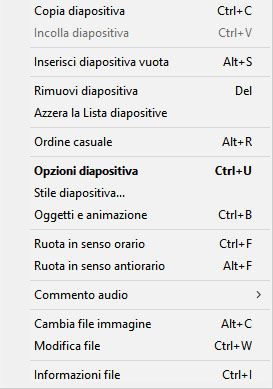
Il menu di contesto (clic destro) per le diapositive nella Lista diapositive (o nella Timeline):
- Edit - (Ctrl+W) Invia l'oggetto principale 1 della diapositiva all'Editor scelton in Impostazioni/ Preferenzes / Sistema - non disponibile per la selezione di più diapositive.
Aggiungere o rimuovere diapositive
Aggiungere diapositive
Metodo 1
Si fa doppio clic su un'immagine/videonel Pannello file per fare apparire l'immagine come diapositiva nella sottostante Lista diapositive.
Metodo 2
Si seleziona una o più immagini/video nel Pannello file con il mouse e si trascina nella Lista diapositive.
Metodo 3
Si seleziona una o più immagini/video nel Pannello file con il mouse e si preme il tasto Invio.
Metodo 4
Si seleziona una o più immagini/video nel Pannello file con il mouse, si richiama il menu a discesa e si sceglie “Aggiungi i file selezionati al progetto”.
Metodo 5
Si preme Ctrl+D per aggiungere tutte le immagini/videodella cartella corrente nella Lista diapositive.
Rimuovere diapositive
Metodo 1
Si seleziona una o più diapositive nella Lista diapositive con il mouse e si trascina nel sovrastante Pannello file.
Metodo 2
Si seleziona una o più diapositive nella Lista diapositive con il mouse e si preme il tasto Del nella tastiera.
Metodo 3
Si seleziona una o più diapositive nella Lista diapositive con il mouse e si fa clic sul piccolo pulsante “X” situato vicino al pulsante “Oggetti e animazione”.
Metodo 4
Select one or several slides in the Slide list by mouse and call popup menu, then choose “Remove Slide”.
Vista Timeline
Si veda anche la Scheda Audio in Opzioni progetto.
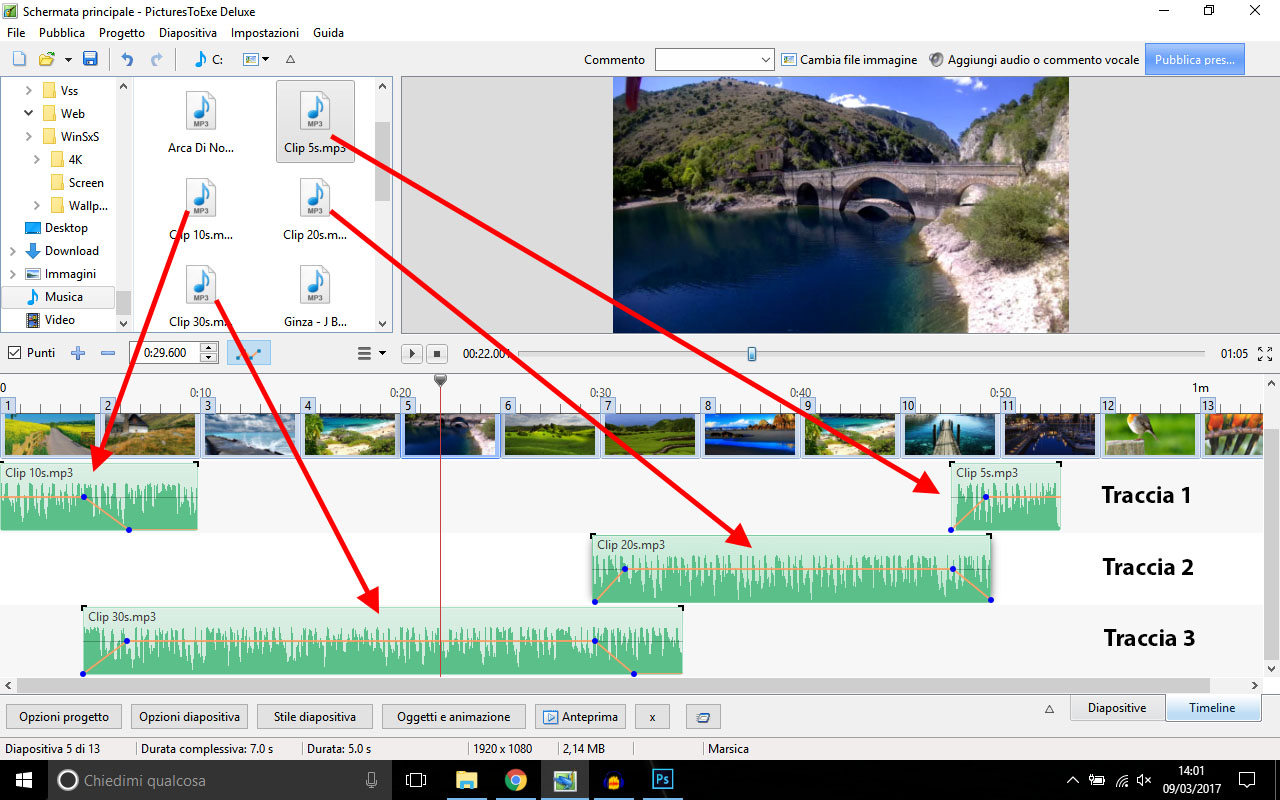
I file audio possono essere trascinati nelle tracce della Timeline dal Pannello file.
Da notare che la posizione (tempo) del file audio aggiunto è determinata dall'azione di trascinamento.
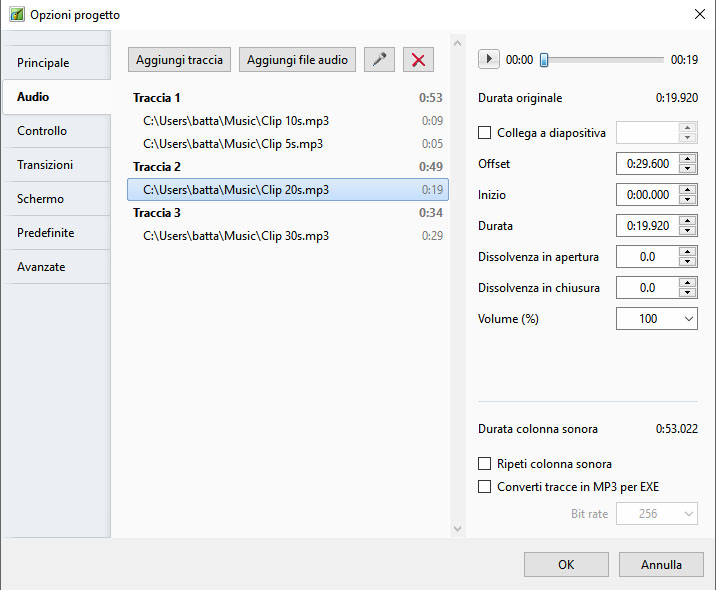
La corrispondente scheda Audio delle Opzioni progetto ha l'aspetto simile al seguente:
Da notare che il valore “Offset” per il file audio nella Traccia 2 nell'esempio precedente è di 0 secondi nella Timeline. Il valore “Offset” per il secondo file audio nella Traccia 1 sarebbe calcolato dalla fine del primo file audio nella Tracia 1. Le dissolvenze in entrata (Fade In) e le Dissolvenze in uscita (Fade Out) applicate con la funzione Inviluppo non sono evidenziate nella scheda Audio delle Opzioni progetto.
Gestione dei file audio
- By clicking on an Audio File it can be dragged along the horizontal axis of the Timeline to a new position. Shift+Clicking on an Audio File will prevent movement between tracks.
- By clicking on an Audio File it can be moved vertically from its existing track to a different track.
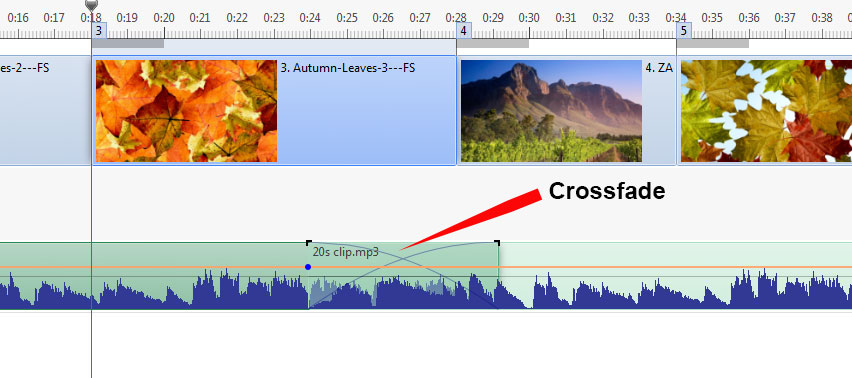
- “Overlapping” Audio Files in the same track will create an automatic Crossfade between the two Audio Files.
- The duration of the Fade Out and Fade In will be determined by the overlap time.
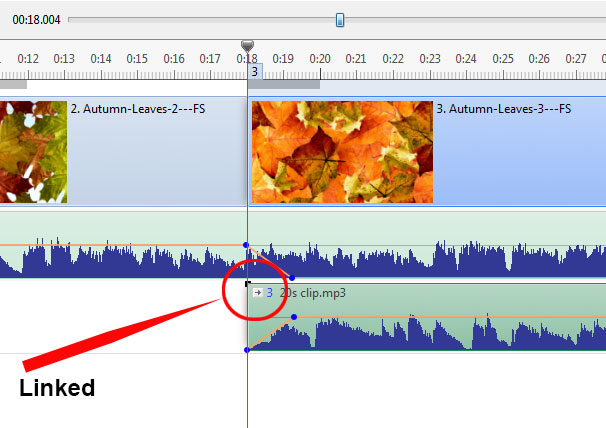
- Audio Files can be Linked to specific Slides. Linked Audio Files are best placed in their own tracks. The position of the Cursor (red line) determines the Slide to which the Audio File can be linked. (Note that the setting for “Synchronize soundtrack and slides” in Project Options / Advanced should be On or Ticked).
- Clicking on an Audio File and dragging it upwards until a Red Cross appears will delete the file.
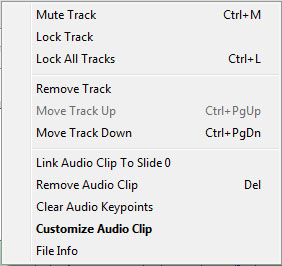
- Right clicking on an Audio Track brings up the following menu items:
- Mute Track (Ctrl+M) - Mutes the audio of the selected track.
- Lock Track - Prevents movement of the track
- Lock all tracks (Ctrl+L) - Prevents accidental movement of all tracks. Can be overridden (for slides) by clicking on numbered tab and dragging.
- Remove track - Deletes the selected track
- Move Track Up (Ctrl+PgUp) - Moves the selected track up by one step
- Move Track Down (Ctrl+PgDn)- Moves the selected track down by one step
- Link Audio Clip….. - Links the selected Audio File to the Slide marked by the cursor (one Audio Clip per Slide per track)
- Remove Audio Clip (Del) - Deletes the Audio File
- Clear Audio Keypoints - Removes all Keypoints in the selected track
- Customize Audio Clip - Activates the Project Options/Audio Tab
- File Info - Information about the selected Audio File
L'inviluppo
Not available in the Essentials Edition
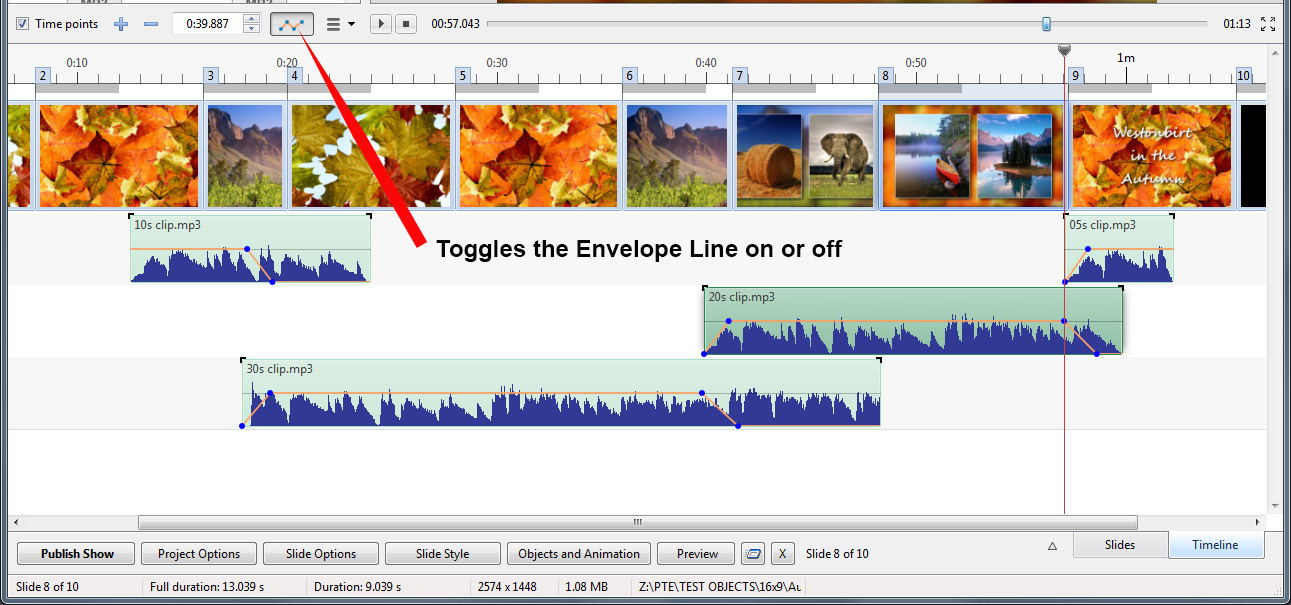
The Envelope Line is activated by clicking on the Envelope Icon as shown:
- The Colors of the Envelope Line, Waveform, Keypoint and Shading can be selected in the Timeline Tab of Settings / Preferences.
- It is also possible to change the Waveform from “Mixed Channels” to “Compact View of Mixed Channels” in the Timeline Tab.
Punti chiave
Not available in the Essentials Edition
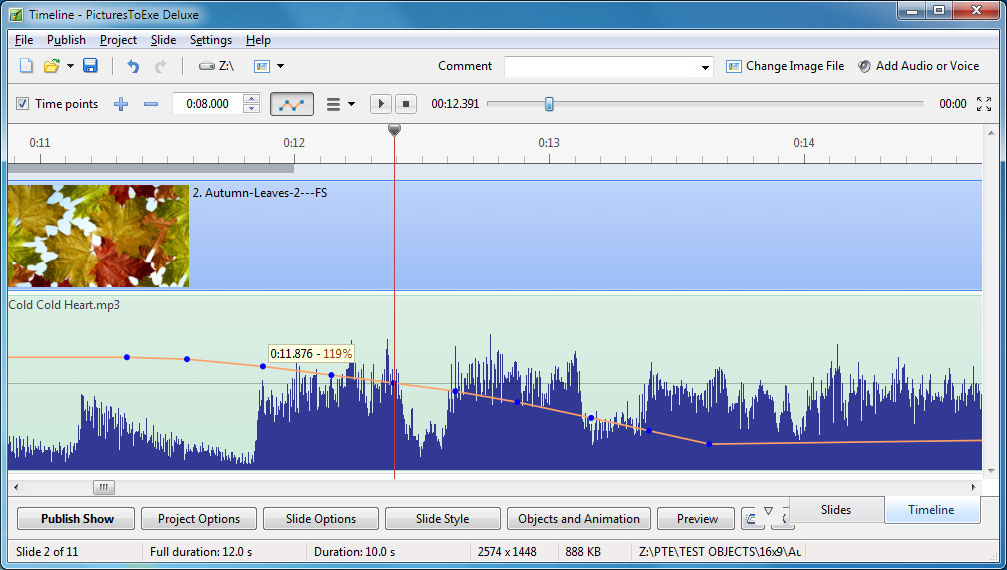
- Clicking on the Envelope Line creates a Keypoint at that position. The resulting Keypoint can be moved along the Envelope Line for positioning its time and moved up or down to raise or lower the volume at that point. To create a Fade add two Keypoints and adjust the volume between them. See the example above.
- Hovering the mouse over a Keypoint will show the Time and Volume values at that position. The Volume can be represented in percentage or in decibels and can be changed in the Timeline Tab of Settings / Preferences.
- Right Clicking on a Keypoint deletes the Keypoint.
- By using a combination of Ctrl+Mouse Wheel to adjust the Width of a track (Zoom) and the Track Height adjustment in the Timeline Tab of Preferences to maximise the view, it is possible to fine tune the positioning of Keypoints accurately. Ctrl+Shift+Mouse Wheel will also adjust Track Height.
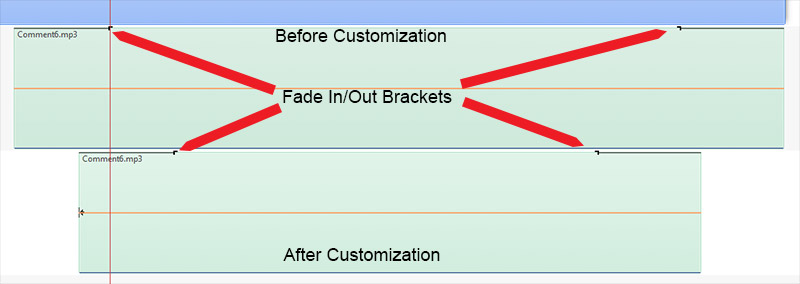
- Please note that if an Audio Clip having Key Points at the extremes (beginning or end) is customized by having its Duration altered (Start Time and/or Duration) either in the Project Options/Audio Tab or by dragging in the Timeline, it is possible that these Key Points will no longer be seen but will still be active. This might result in an unexpected sound level effect.
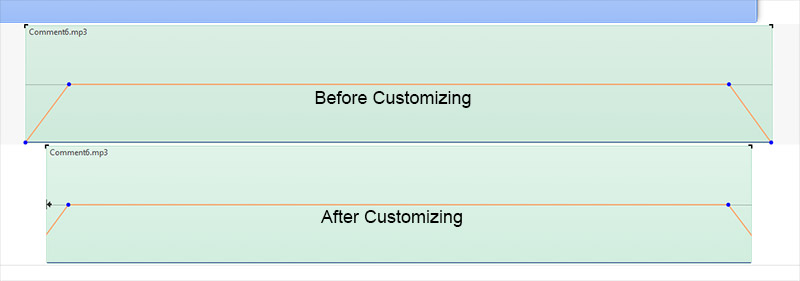
- The Fade In and Fade Out Brackets in the Timeline are not affected in the same way. The settings of the Fade In Bracket and Fade Out Bracket are reflected in the Project Options/Audio Fade settings for the Audio Clip
Altri controlli nella vista Timeline
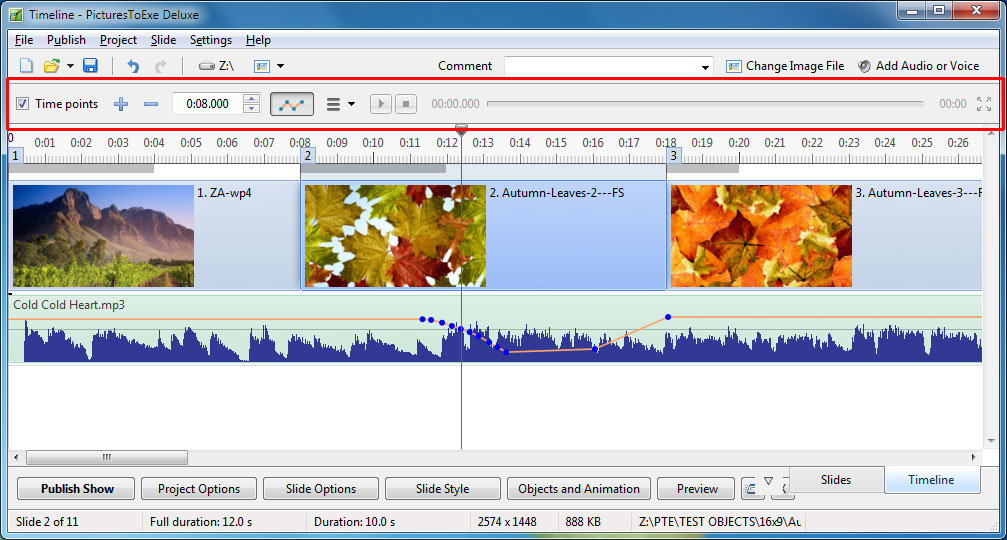
In the image above, from left to right:
- Time Points - Toggles the Slide Numbers (1,2,3 etc) on or off
- + (Plus) - Adds a Time Point at the Cursor Position
- - (Minus) - Cuts the last Time Point in the Timeline to a position beyond the end of the Audio Tracks
- The time shown is the start time of the Slide under the cursor - it is possible to fine tune the start time using up and down controls or by typing in the box
- The Envelope Icon - Toggles the Envelope on or off in all tracks
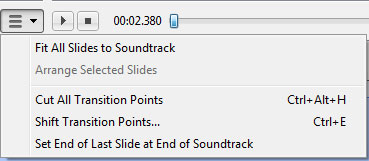
- The “triple horizontal line” (Timeline Options) Icon brings up the menu shown below
- Fit All Slides to Soundtrack - adjusts the time of each equally and fits them to the soundtrack time
- Arrange Selected Slides - select a group of slides and arrange them equally spaced
- Cut All Transition Points - moves all transition points to a point beyond the end of the soundtrack
- Shift Transition Points - select one or more slides and move their transition point(s) by a fixed amount
- Set End of Last Slide at End of Soundtrack - useful for synchronizing the end of the last slide with the soundtrack
- The PLAY button starts the MINI-PLAYER from the Cursor Position
- The STOP Button stops the Mini-Player and returns the Cursor to the previous position
- The time shown at the end of the progress bar shows the End of the Last Slide
- The Four Arrow Icon starts the Full Screen Preview from the Cursor Position
Anteprima dei file audio
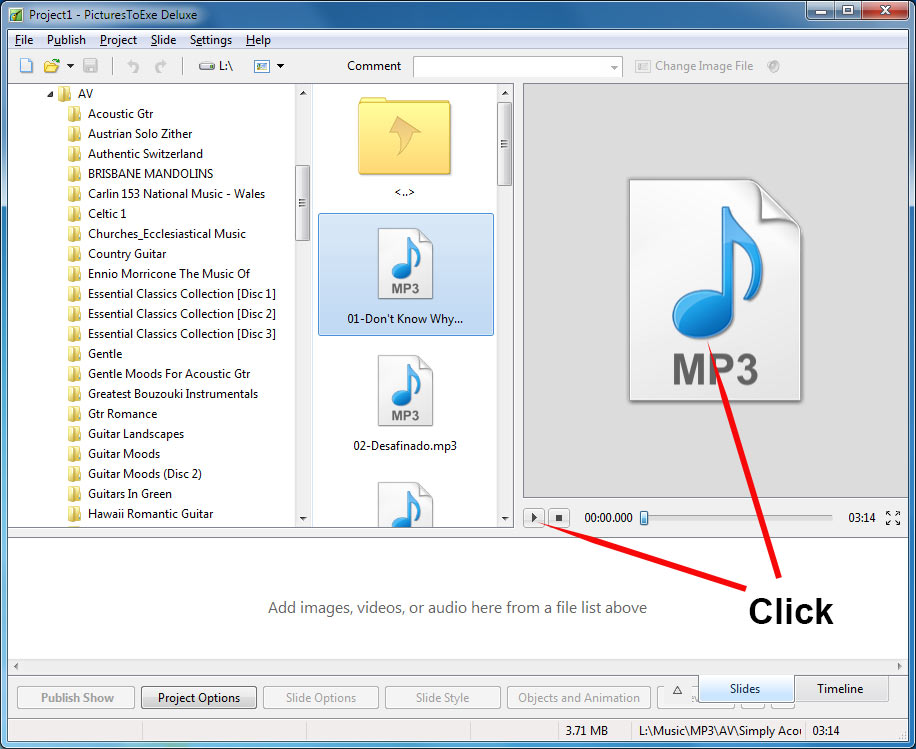
- In the File List, navigate to the folder containing Audio Files and click on a file. Its icon appears in the Mini Player viewer. Click on the icon in the Mini-Player Viewer or the Start Button to preview the Audio File.
Immagini
- Dragging images into the Timeline View is NOT advised. This is best done in the Slide List View. The DROP point overrides the Project Options / Slide Duration default and can lead to confusion.
Configurare la finestra principale
La Finestra principale può essere configurata per adattarla alle specifiche esigenze dell'utente e alle dimensioni del monitor.
Vista Lista diapositive
La vista a schermo intero
Vista Lista diapositive
Vista Timeline
it-it/9.0/main_window/main.1489064676.txt.gz · Last modified: 2022/12/18 11:20 (external edit)
Except where otherwise noted, content on this wiki is licensed under the following license: CC Attribution-Noncommercial-Share Alike 4.0 International
